ctcLink Account

ctcLink provides students, faculty and staff members a centralized and coherent system
to navigate their college business. This system provides easier and more reachable
access to college resources. It also combines the student information in a single
data set to improve the experience of students looking to transfer to other schools
and colleges within the State of Washington.
About ctcLink Account
The ctcLink account gives a student access to the following applications:
- "Manage Classes": Class Enrollments and registrations
- "Financial Aid": Manage financial aid awards and applications.
- "Academic Records": View past Classes with grades and get unofficial transcripts.
- "Profile": View or update personal information.
The ctcLink Account ID and password are also the credentials to the Canvas account.
Login to MyClark@ctcLink
ctcLink Account Setup
Activate ctcLink Account
To activate your ctcLink Account, please follow the steps below:
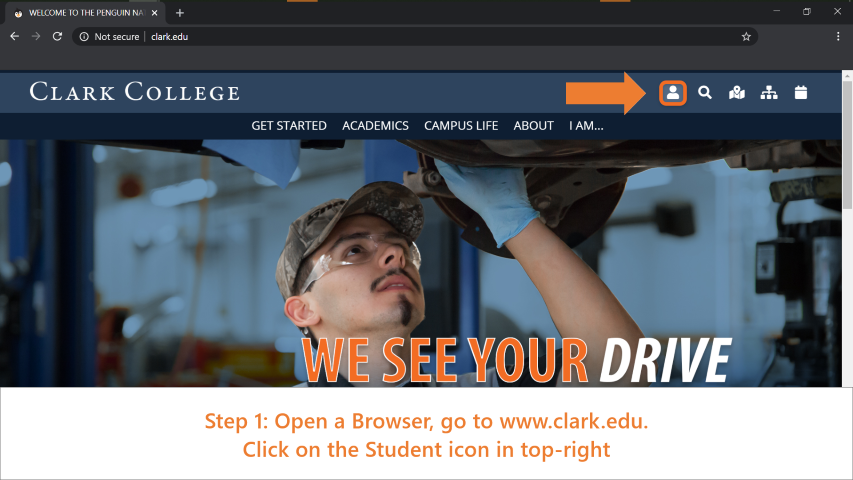
Step 1:
Open a browser and go to www.clark.edu. Then click on the 'Document and Resources
for Clark Students' icon.
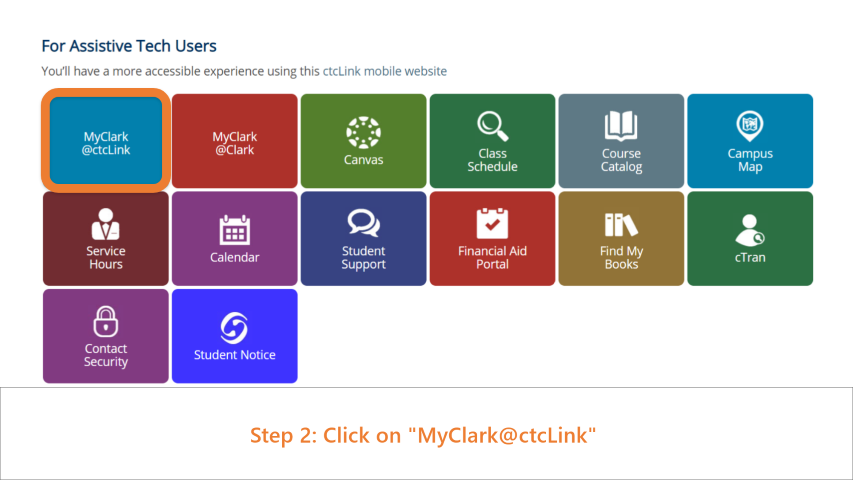
Step 2:
From the tiles, click on MyClark@ctclink.
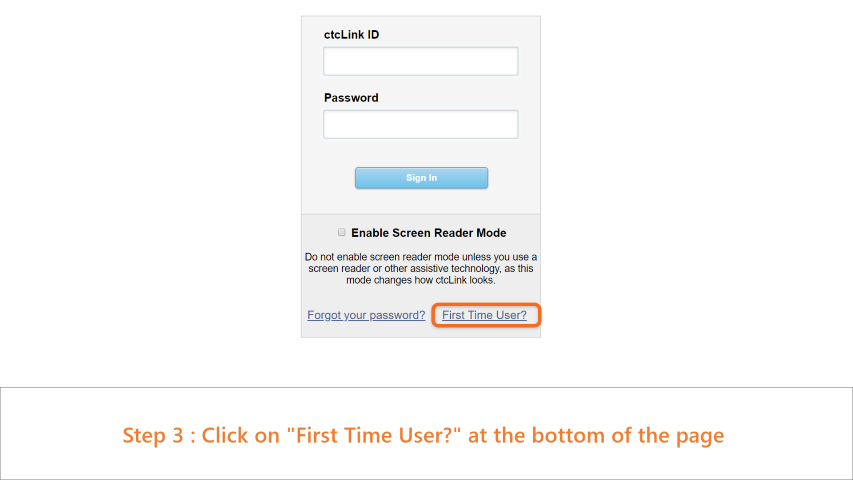
Step 3:
Click on 'First Time User' at the bottom of page.
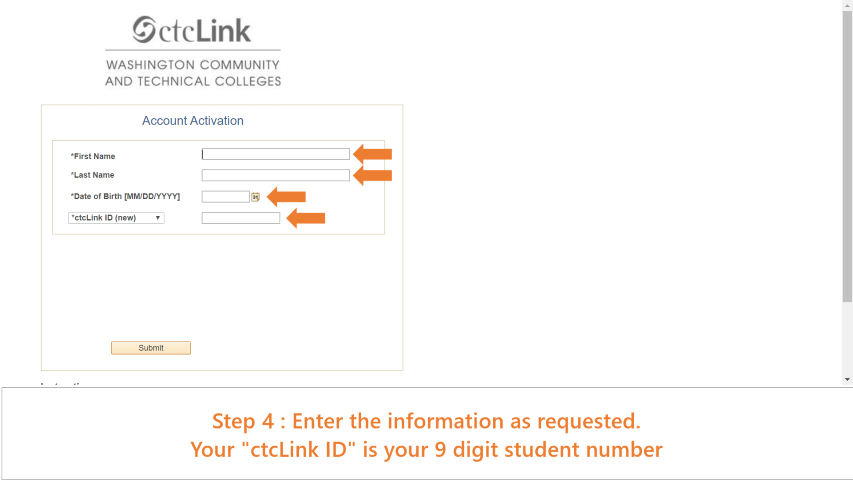
Step 4:
Enter the information as requested.
Your ctcLink ID is your 9 digit student number.
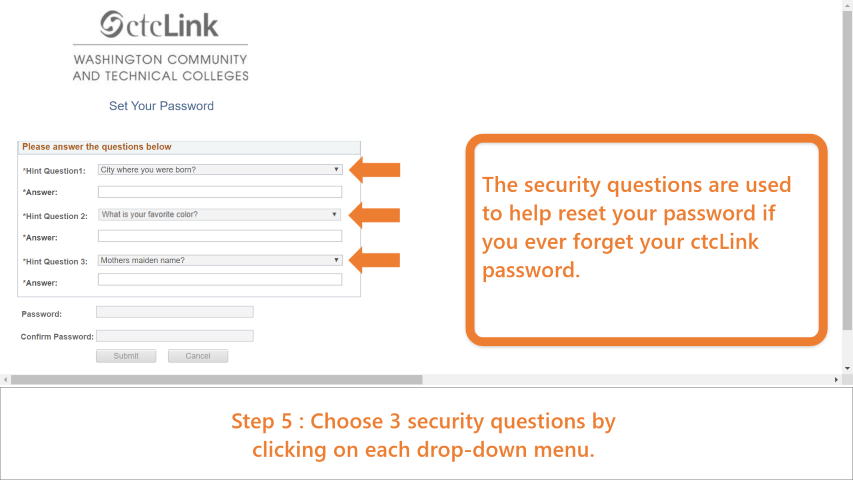
Step 5:
Choose 3 security questions by clicking on each drop down menu.
The security questions are used to help reset your password if you ever forget your
ctcLink password.
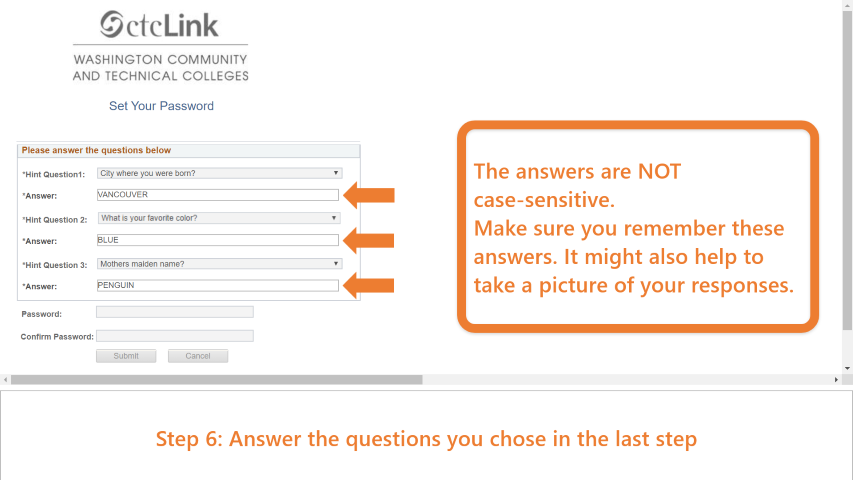
Step 6:
Answer the questions you chose in the last step.
The answers are NOT case sensitive.
Make sure you remember these answers. It might also help to take a picture of your
responses.
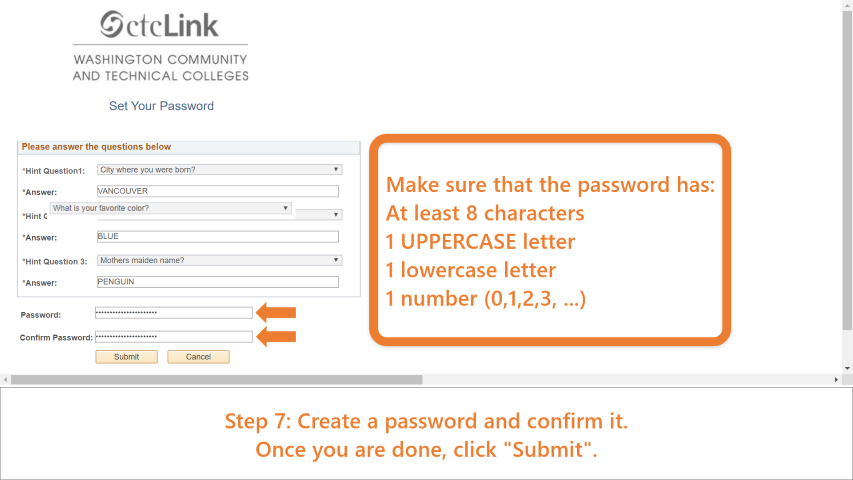
Step 7:
Create a password and confirm it.
Make sure that the password has:
- At least 8 characters
- 1 UPPERCASE letter
- 1 lowercase letter
- 1 number (0,1,2,3, ...)
Once you are done, click "Submit".
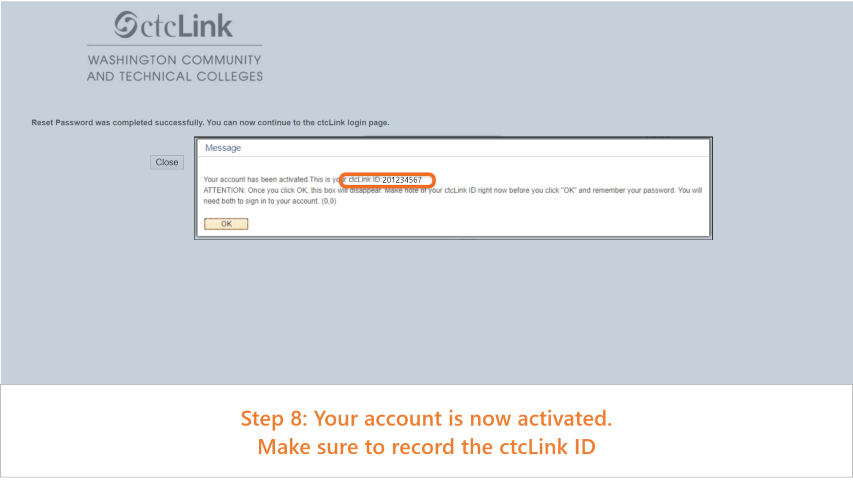
Step 8:
Your account is now activated.
Make sure to record the ctcLink ID.
Reset ctcLink Account Password
If you forgot or lost your ctcLink Account password, please follow the steps below:
Step 1:
Open a browser and go to www.clark.edu. Then click on the 'Document and Resources
for Clark Students' icon.
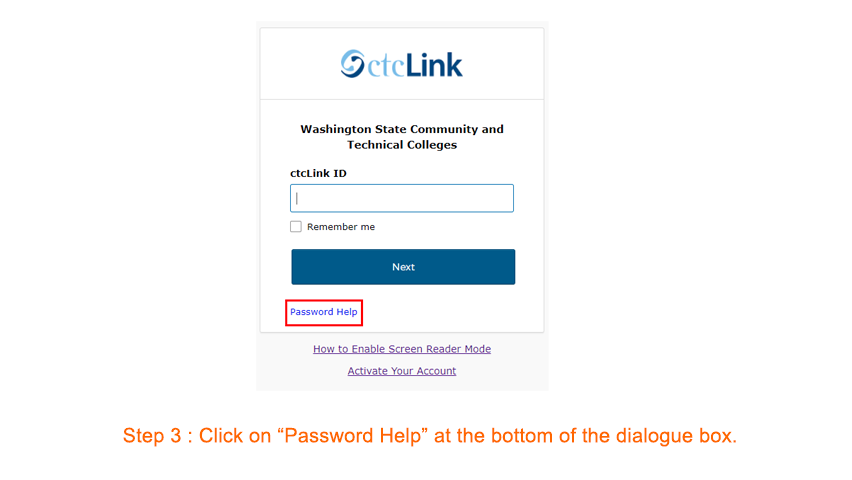
Step 2:
From the tiles, click on MyClark@ctclink.
Step 3:
Click on 'Password Help' at the bottom of the dialogue box.
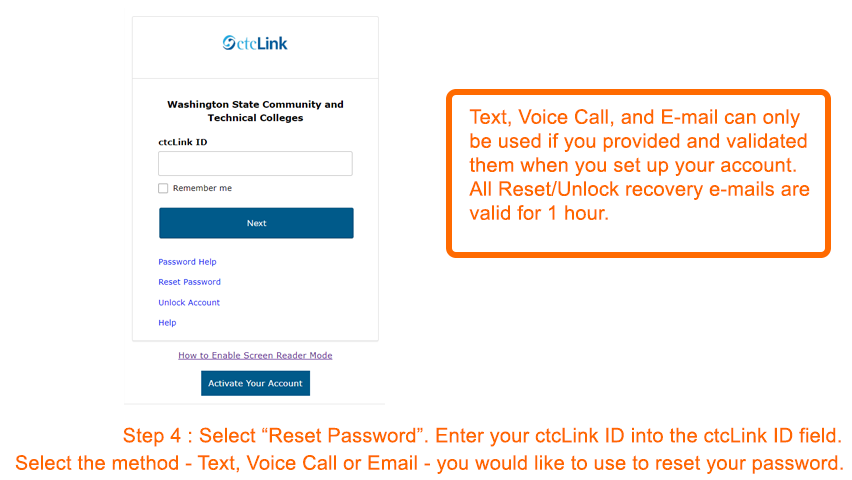
Step 4:
Select "Reset Password".
Enter your ctcLink ID into the ctcLink ID field and select which method - Text, Voice
Call or Email - you would like to use to reset your password.
Note: Text, Voice Call, and E-mail can only be used if you provided and validated
them when you set up your account. All Reset/Unlock recovery e-mails are valid for
1 hour.
Get ctcLink ID
In order to get your ctcLink ID, please follow the guide below:
Step 1:
Open a browser and go to www.clark.edu. Then click on the 'Document and Resources
for Clark Students' icon.
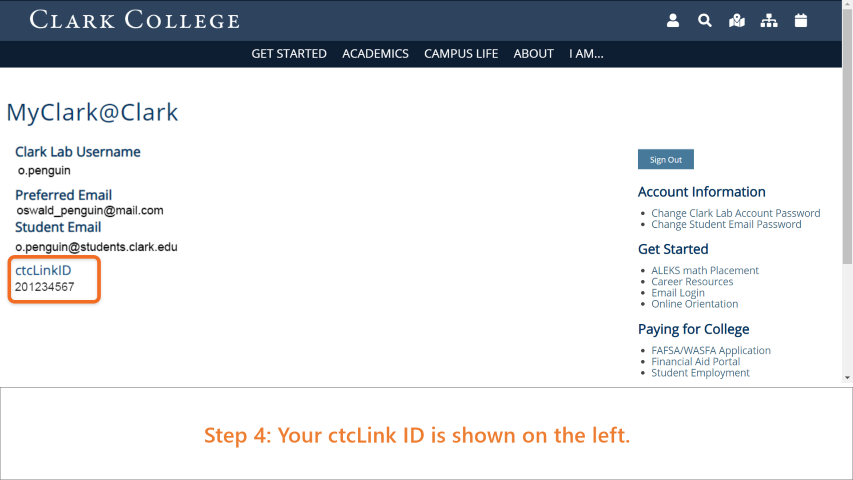
Step 2:
From the tiles, click on MyClark@Clark.
Step 3:
Enter your Clark Labs Account credentials.
Step 4:
Your ctcLink ID is shown on the left.
Update preferred contact
Log in to MyClark@ctcLink and follow the guide below to change preferred contact:
Step 1:
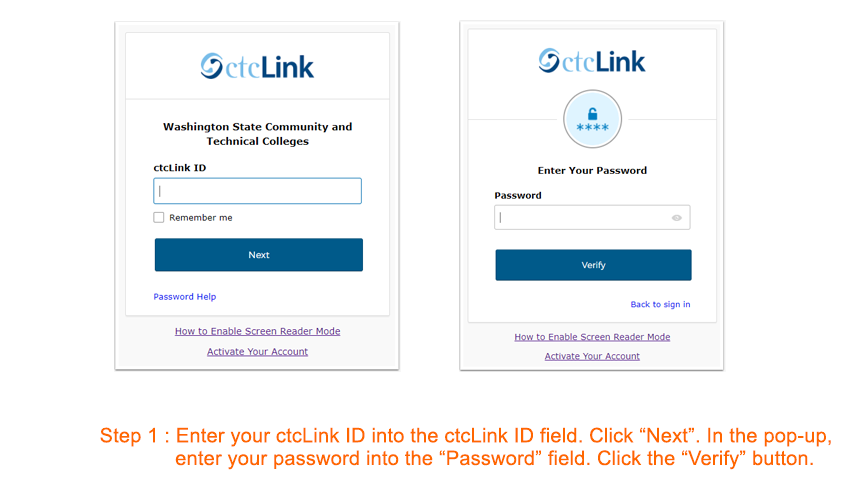
Enter your ctcLink ID into the ctcLink ID field then select the 'Next' button.
In the resulting pop-up, enter your password into the 'Password' field, then select
the 'Verify' button..
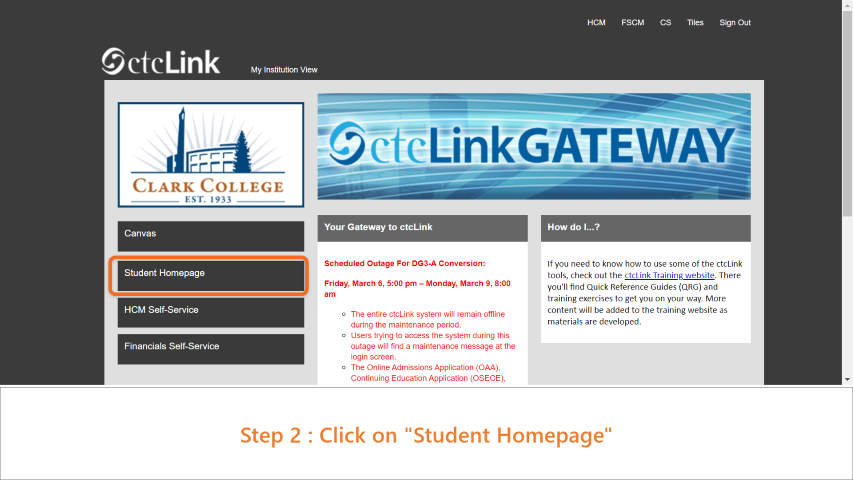
Step 2:
Click on 'Student Homepage'.
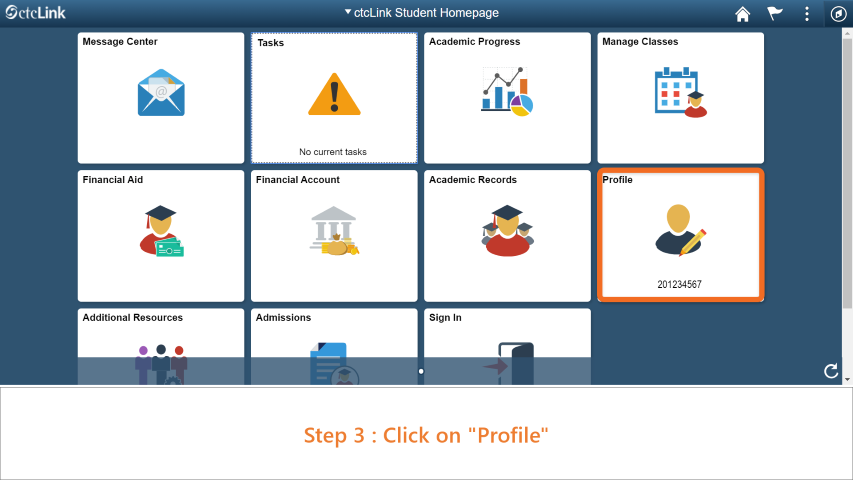
Step 3:
Click on "Profile".
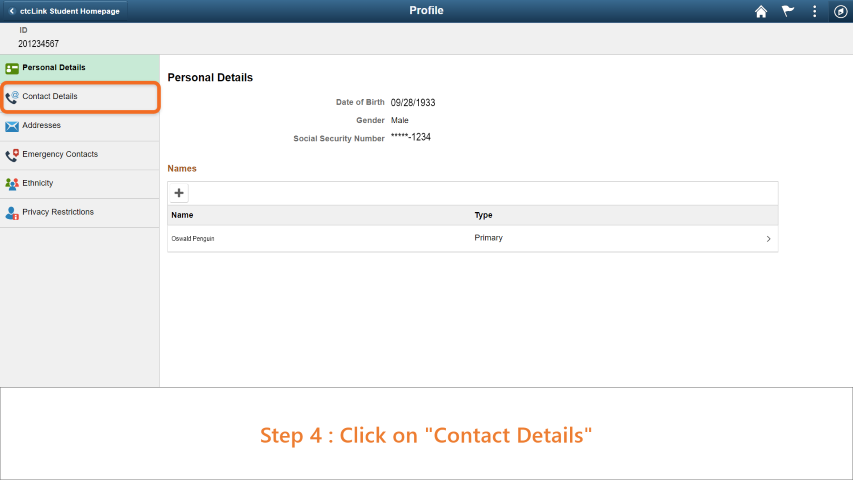
Step 4:
Click on "Contact Details".
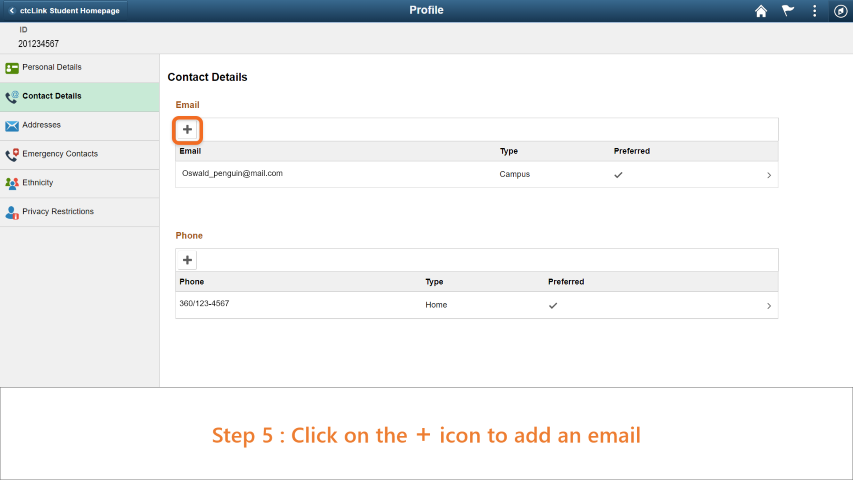
Step 5:
Click the
+ icon to add an email.
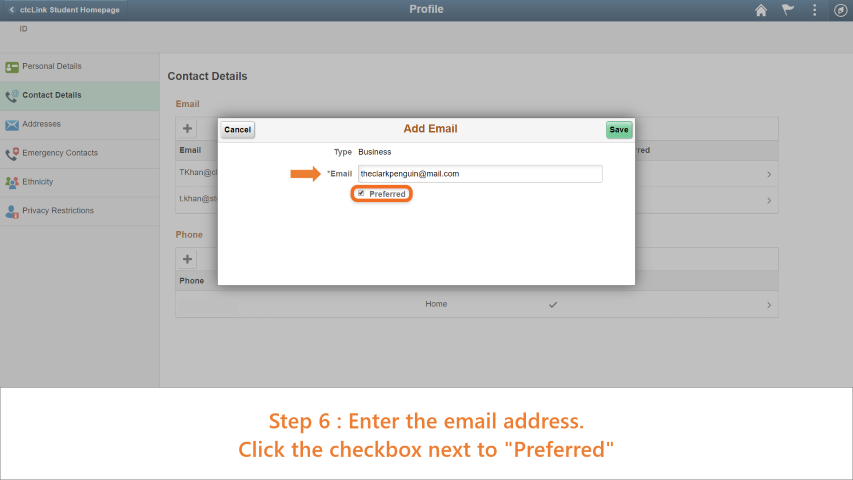
Step 6:
Enter the email address.
Click the checkbox next to "Preferred".
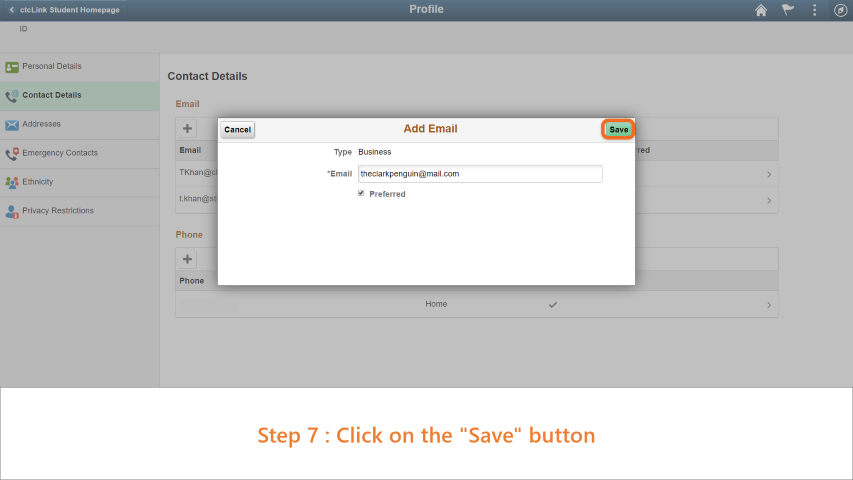
Step 7:
Click on the "Save" button.
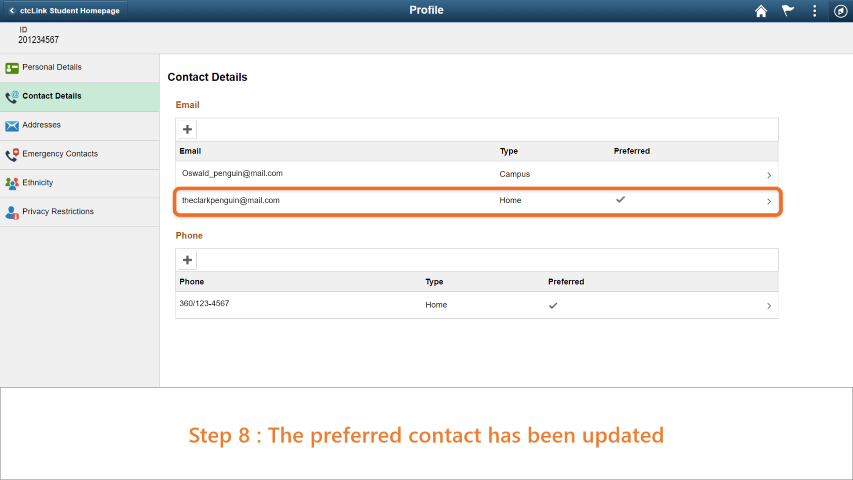
Step 8:
The preferred contact has been updated.
Navigating ctcLink Mobile (High Point)
Enroll in Classes
Log in to ctcLink Mobileand follow the guide below to add Classes to your schedule:
Step 1:
Enter your ctcLink ID into the ctcLink ID field then select the 'Next' button.
In the resulting pop-up, enter your password into the 'Password' field, then select
the 'Verify' button..
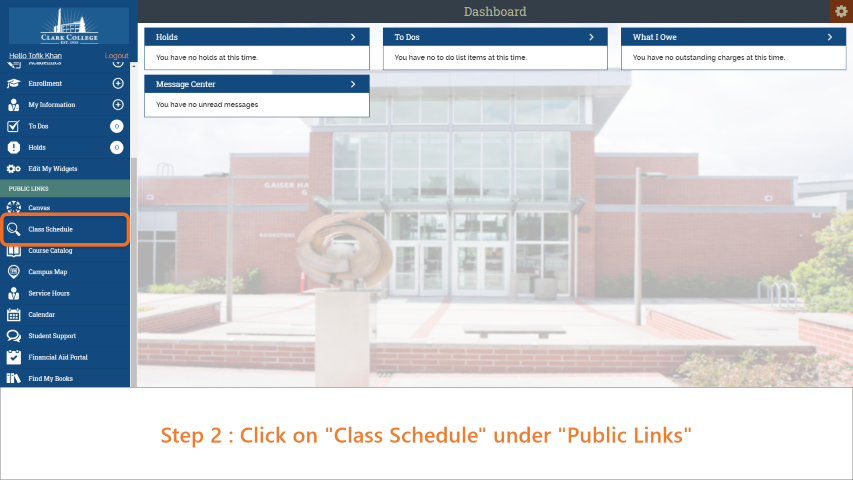
Step 2:
Click on "Class Schedule" under "Public Links".
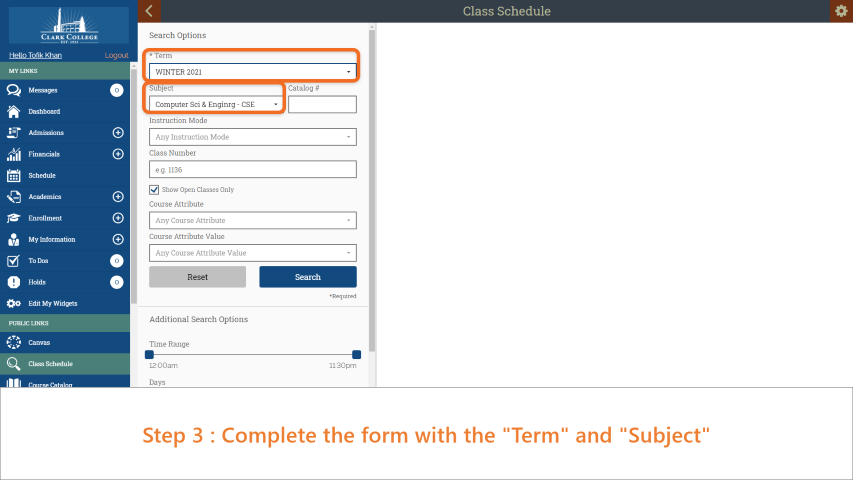
Step 3:
Complete the form with the "Term' and "Subject."
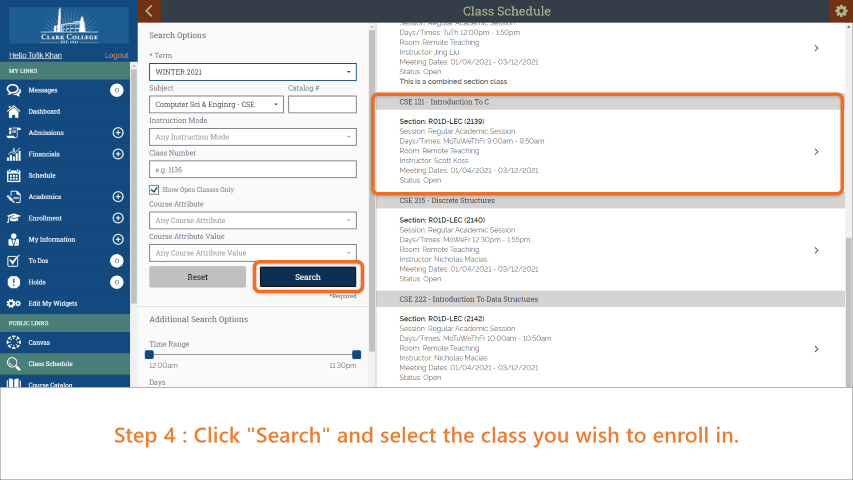
Step 4:
Click "Search" and select the class you wish to enroll in.
Step 5:
Click the "Add to Cart" button under "Class Actions".
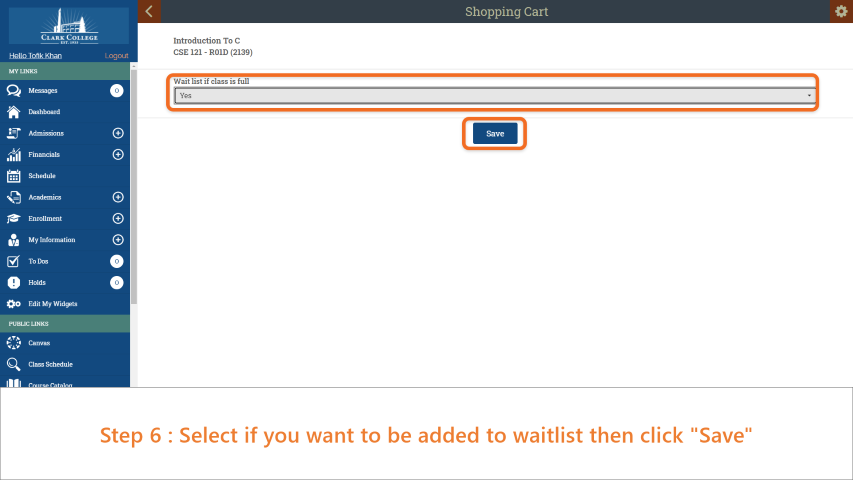
Step 6:
Select if you want to be added to waitlist, then click "Save".
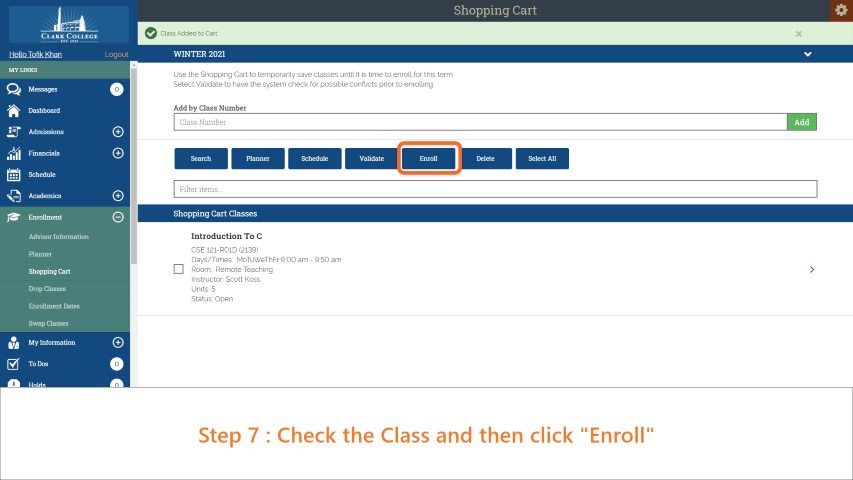
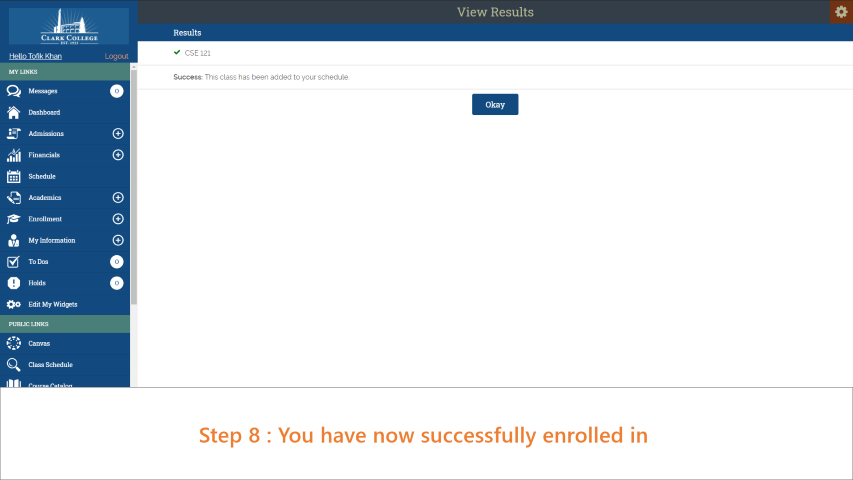
Step 7:
Check the class and then click "Enroll"
Step 8:
You have now successfully enrolled.
Find Your Enrollment Validation Date (Shopping Cart Date)
Log in to ctcLink Mobile and follow the guide below:
Step 1:
Enter your ctcLink ID into the ctcLink ID field then select the 'Next' button.
In the resulting pop-up, enter your password into the 'Password' field, then select
the 'Verify' button..
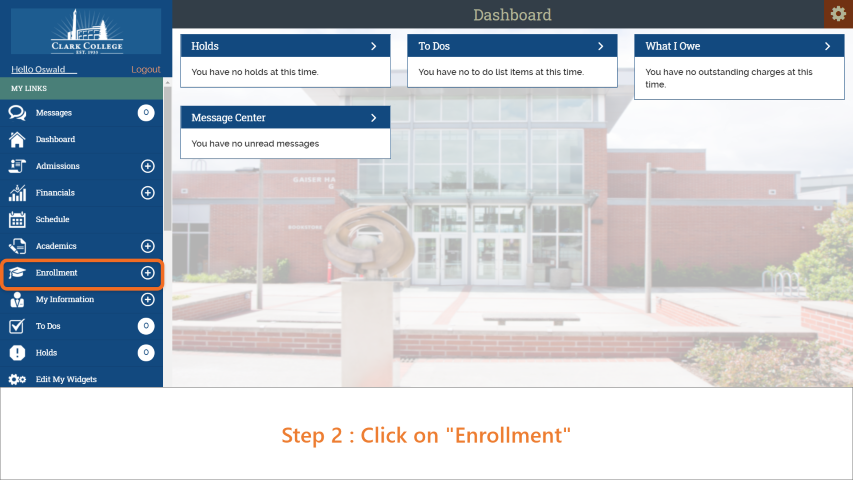
Step 2:
Click on "Enrollment".
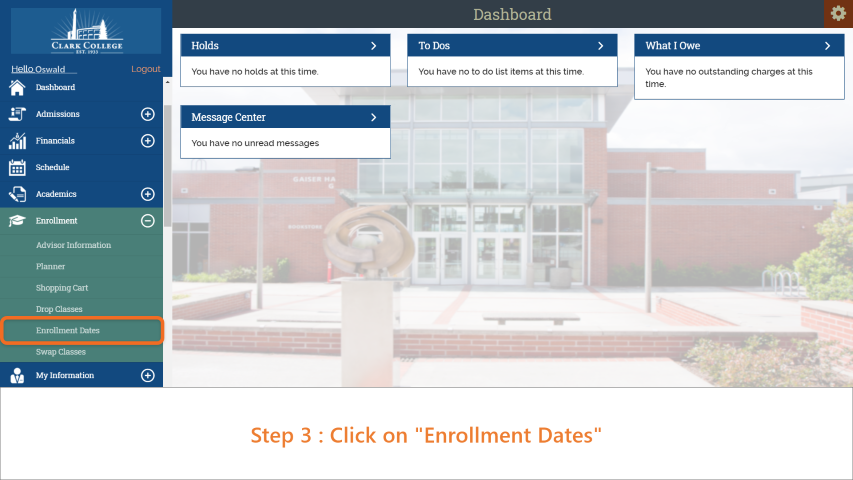
Step 3:
Click on "Enrollment Dates".
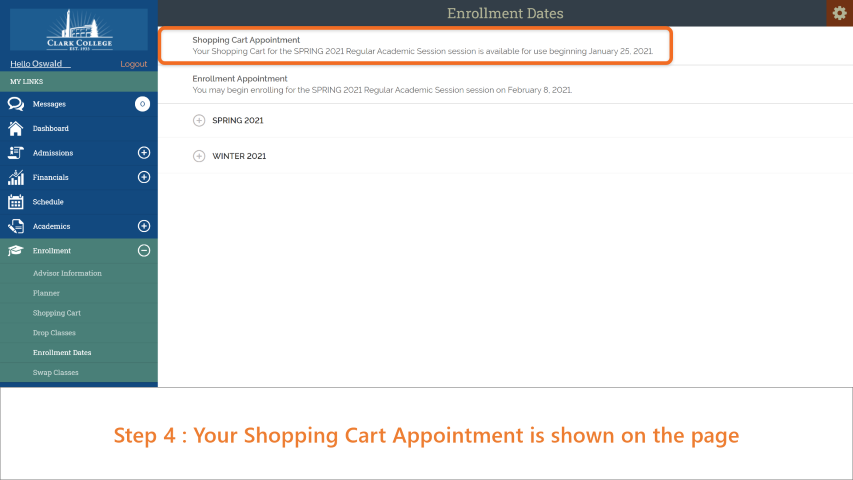
Step 4:
Your Shopping Cart Appointment is shown on the page.
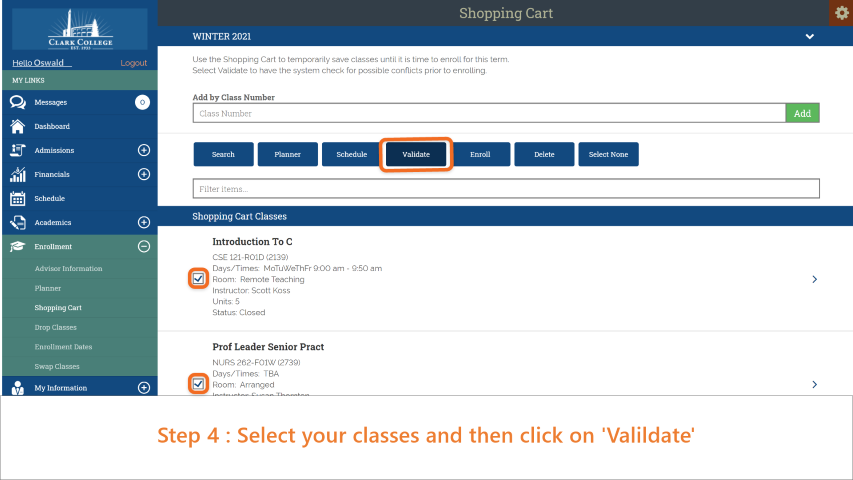
Class Enrollment Verification
Log in to ctcLink Mobile and follow the guide below:
Step 1:
Enter your ctcLink ID into the ctcLink ID field then select the 'Next' button.
In the resulting pop-up, enter your password into the 'Password' field, then select
the 'Verify' button..
Step 2:
Click on "Enrollment".
Step 3:
Click on "Shopping Cart"
Step 4:
Select your classes and then click on "Validate".
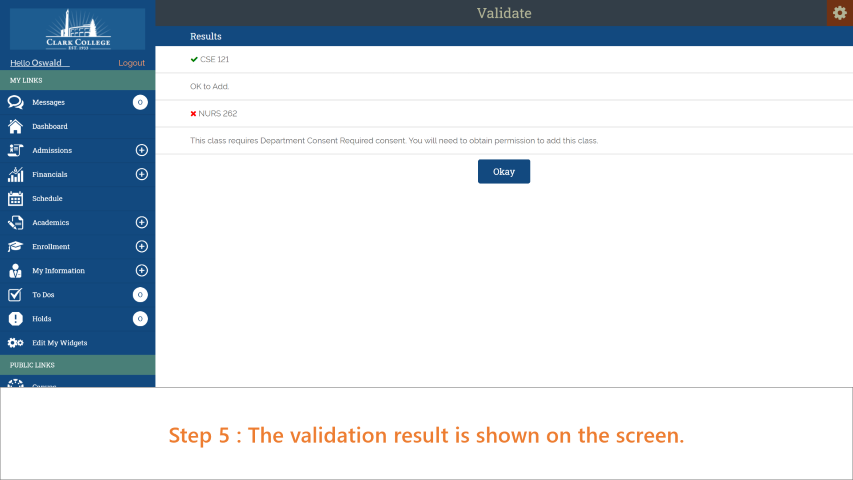
Step 5:
The validation result is shown on the screen.
Navigating ctcLink (Desktop/Browser)
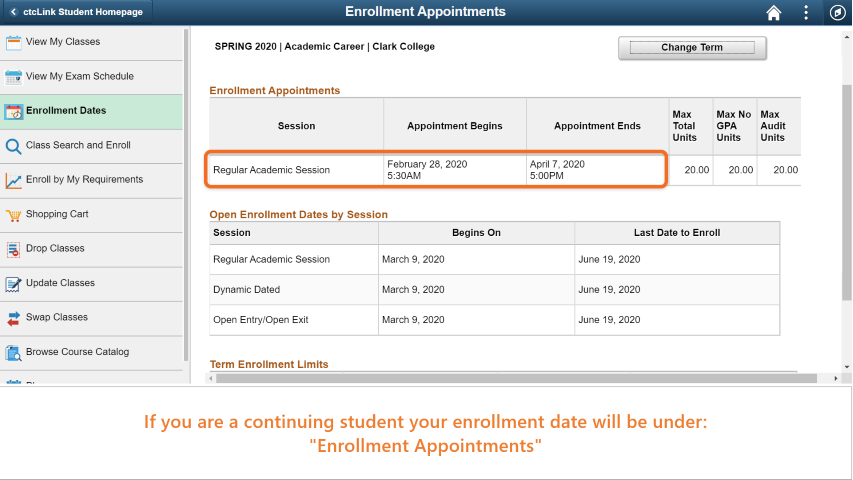
Find Your Enrollment Appointment Date
Registration date for each quarter varies for students. To find your registration
date, log in to MyClark@ctcLink and follow the guide below:
Step 1:
Enter your ctcLink ID into the ctcLink ID field then select the 'Next' button.
In the resulting pop-up, enter your password into the 'Password' field, then select
the 'Verify' button..
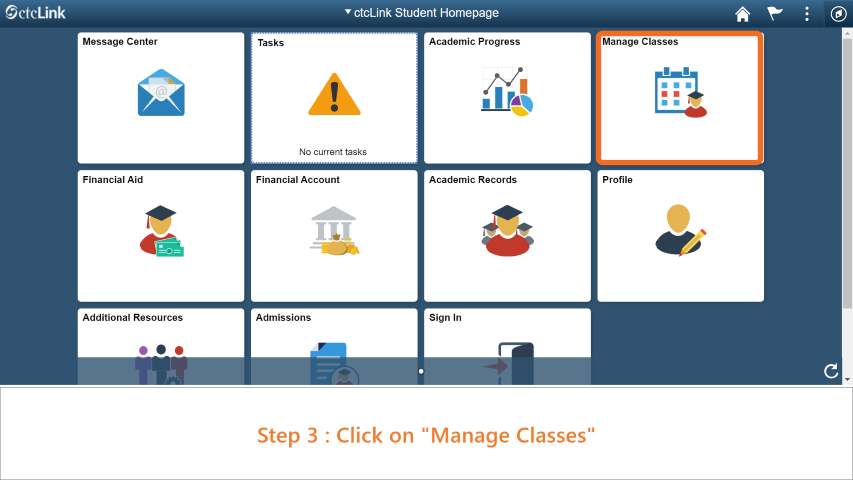
Step 2:
Click on 'Student Homepage'.
Step 3:
Click on "Manage Classes".
Step 4:
Click on "Enrollment Dates" and select the quarter you wish to enroll in.
Click "Continue".
Step 5:
If you are a continuing student, your enrollment date will be under "Enrollment Appointments".
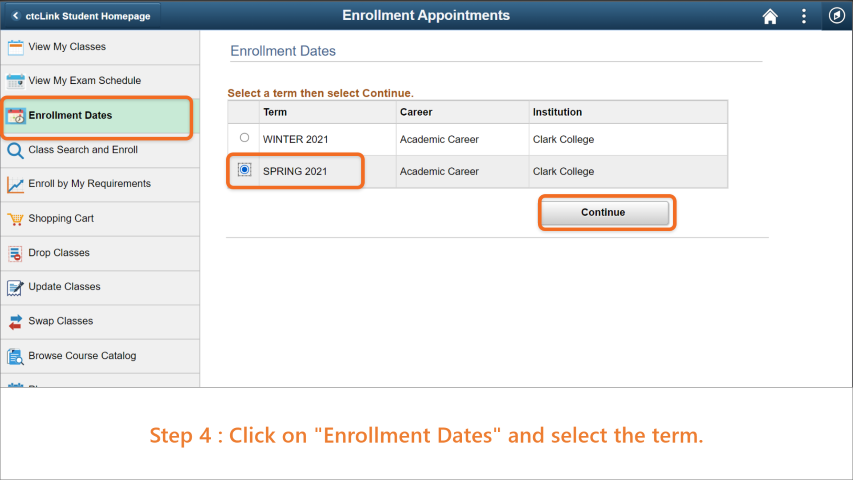
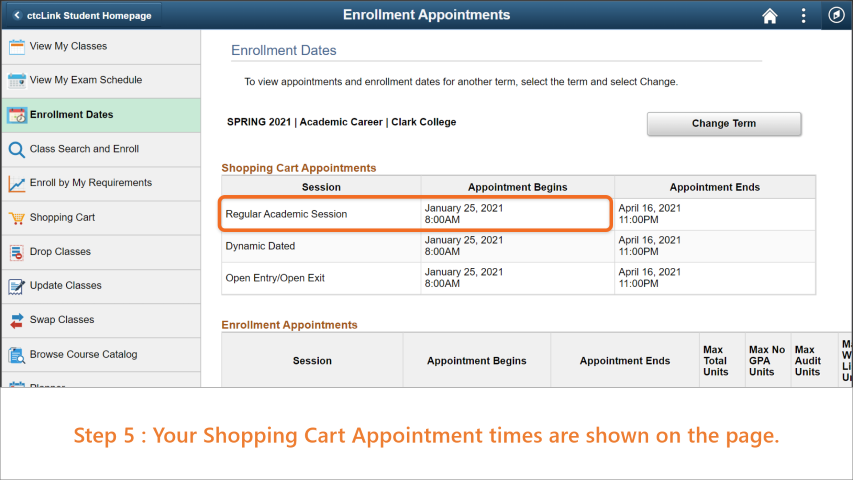
Find Your Enrollment Validation Date (Shopping Cart Date)
Log in to ctcLink and follow the guide below:
Step 1:
Enter your ctcLink ID into the ctcLink ID field then select the 'Next' button.
In the resulting pop-up, enter your password into the 'Password' field, then select
the 'Verify' button..
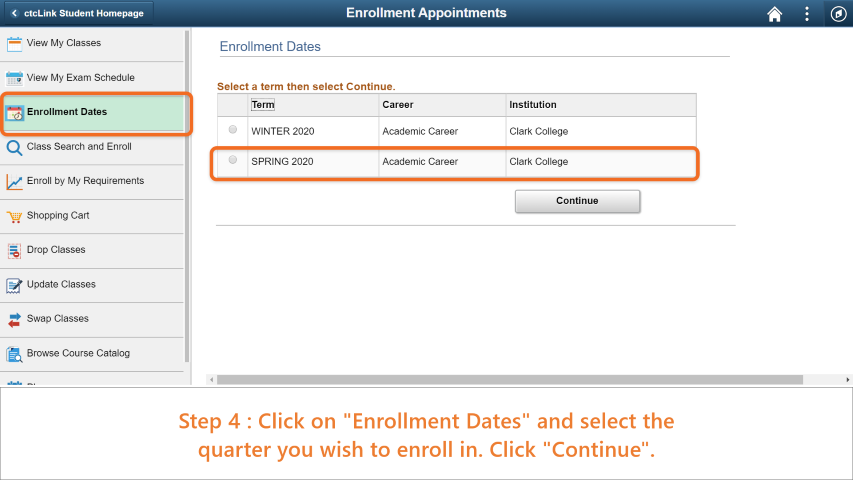
Step 2:
Click on 'Student Homepage'.
Step 3:
Click on "Manage Classes".
Step 4:
Click on "Enrollment Dates" and select the term.
Click "Continue".
Step 5:
Your shopping cart appointment times are shown on the page.
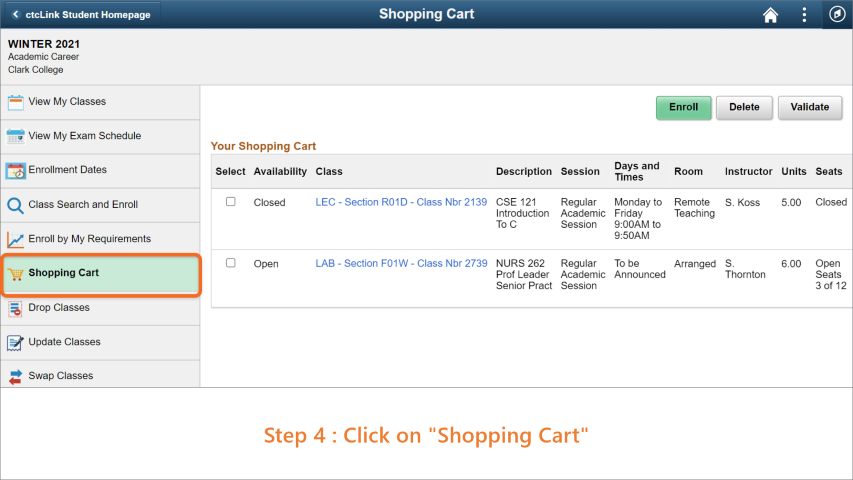
Class Enrollment Verification
Log in to ctcLink and follow the guide below:
Step 1:
Enter your ctcLink ID into the ctcLink ID field then select the 'Next' button.
In the resulting pop-up, enter your password into the 'Password' field, then select
the 'Verify' button..
Step 2:
Click on 'Student Homepage'.
Step 3:
Click on "Manage Classes".
Step 4:
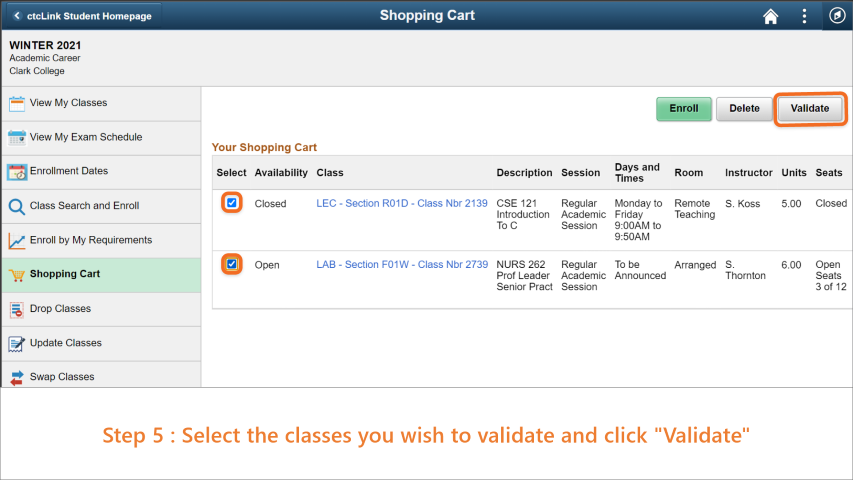
Click on "Shopping Cart".
Step 5:
Select the Classes you wish to validate and click "Validate".
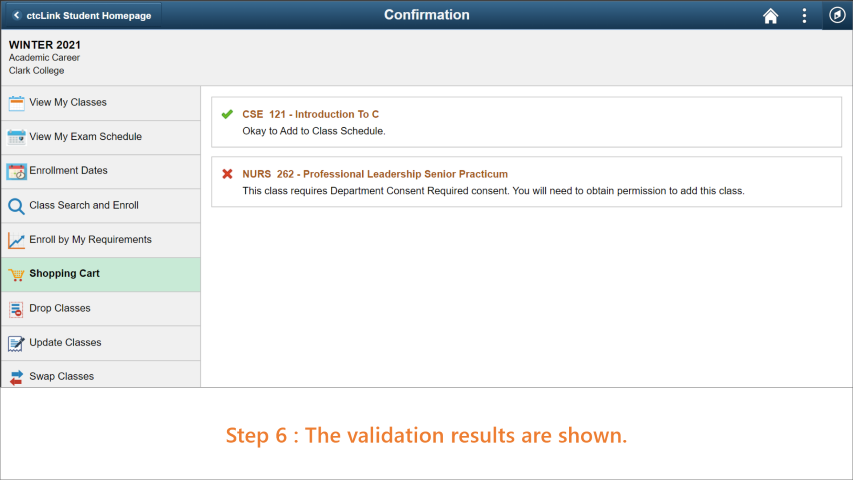
Step 6:
The validation results are shown on the page.
Enroll in Classes
Log in to MyClark@ctcLink and follow the guide below to register for Classes:
Step 1:
Enter your ctcLink ID into the ctcLink ID field then select the 'Next' button.
In the resulting pop-up, enter your password into the 'Password' field, then select
the 'Verify' button..
Step 2:
Click on 'Student Homepage'.
Step 3:
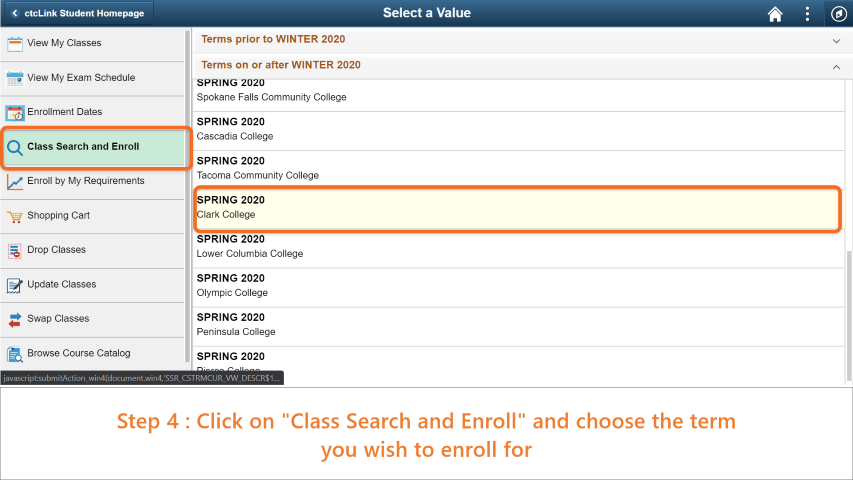
Click on "Manage Classes".
/its/documentation-and-resources/students/images/sliders/ctclink-reg-classes/06.png
Step 4:
Click on "Class Search and Enroll" and choose the term you wish to enroll for.
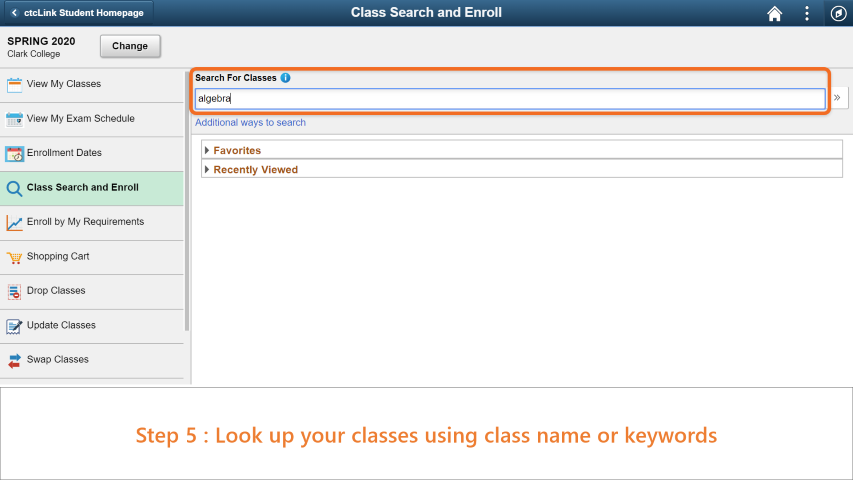
Step 5:
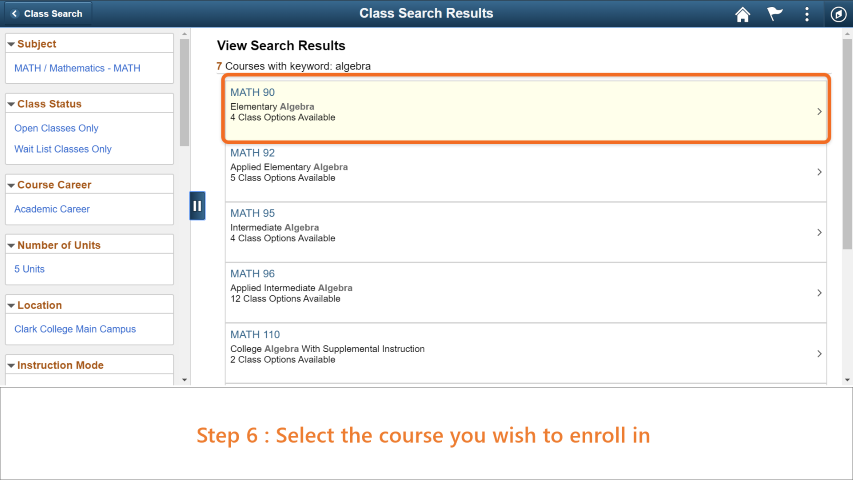
Look up your Classes using the class name or keywords.
Step 6:
Select the course you wish to enroll in.
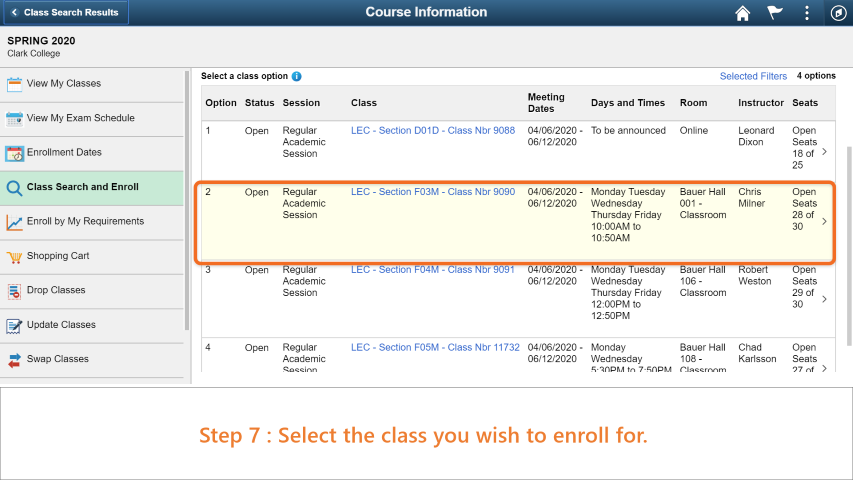
Step 7:
Select the class you wish to enroll in.
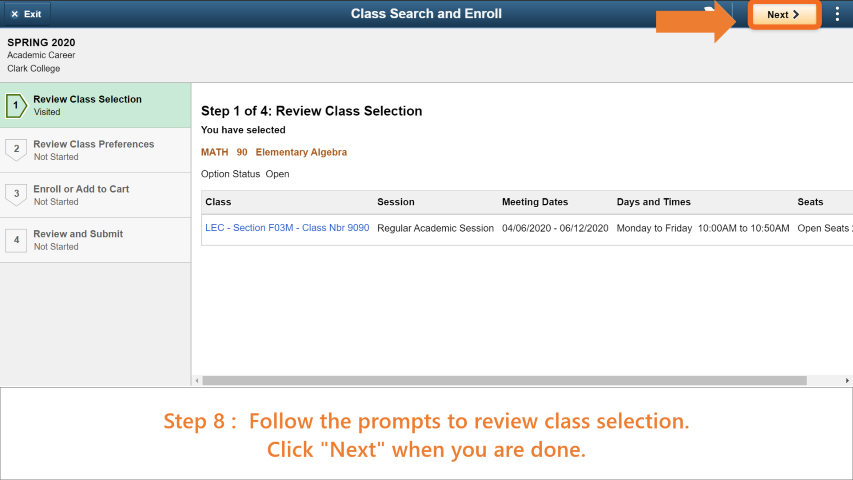
Step 8:
Follow the prompts to review class selection.
Click "Next" when you are done.
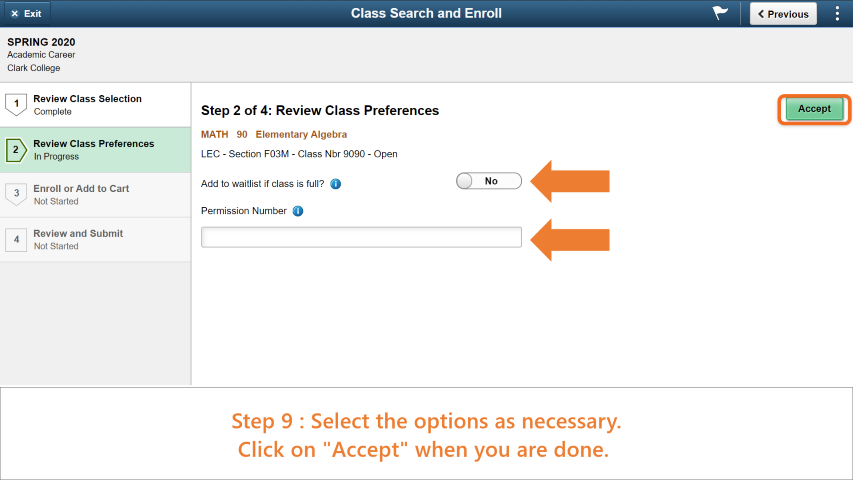
Step 9:
Select the options as necessary.
Click on "Accept" when you are done.
Step 10:
Select if you wish to Enroll" or just put the class in your "Shopping Cart".
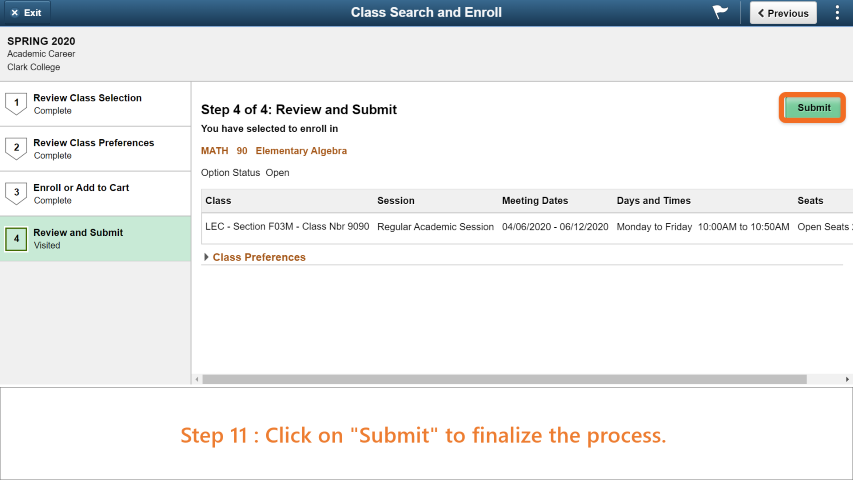
Step 11:
Click on "Submit" to finalize the process.
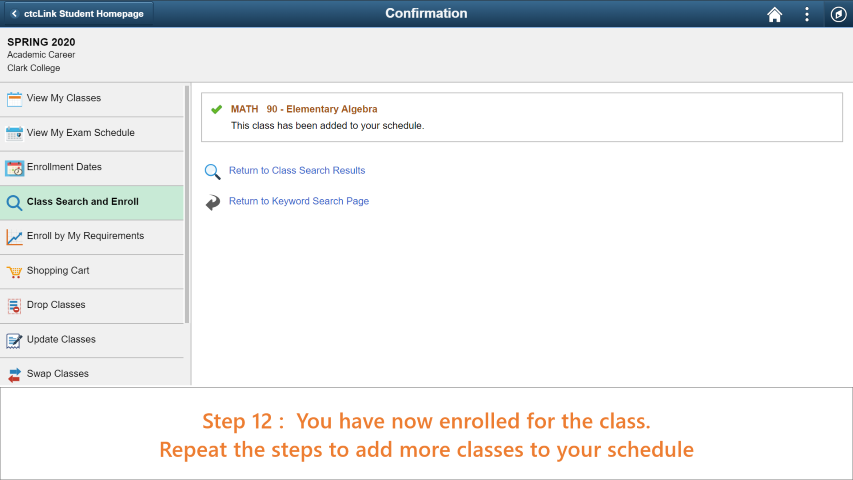
Step 12:
You have now enrolled for the class.
Repeat the process to add more Classes to your schedule.
Enroll in a Class Waitlist
Log in to MyClark@ctcLink and follow the guide below to enter a waitlist for a class:
Step 1:
Enter your ctcLink ID into the ctcLink ID field then select the 'Next' button.
In the resulting pop-up, enter your password into the 'Password' field, then select
the 'Verify' button..
Step 2:
Click on 'Student Homepage'.
Step 3:
Click on "Manage Classes".
Step 4:
Click on "Class Search and Enroll" and choose the term you wish to enroll for.
Step 5:
Look up your Classes using the class name or keywords.
Step 6:
Select the course you wish to enroll in.
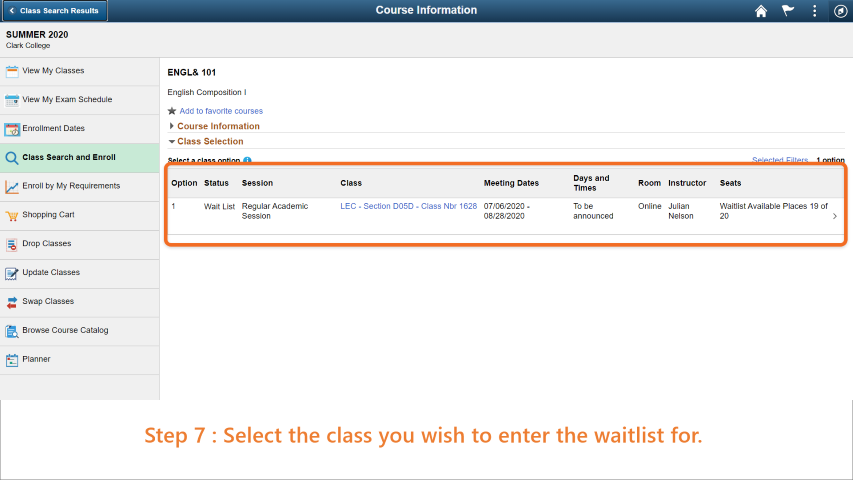
Step 7:
Select the class you wish to enter the waitlist for.
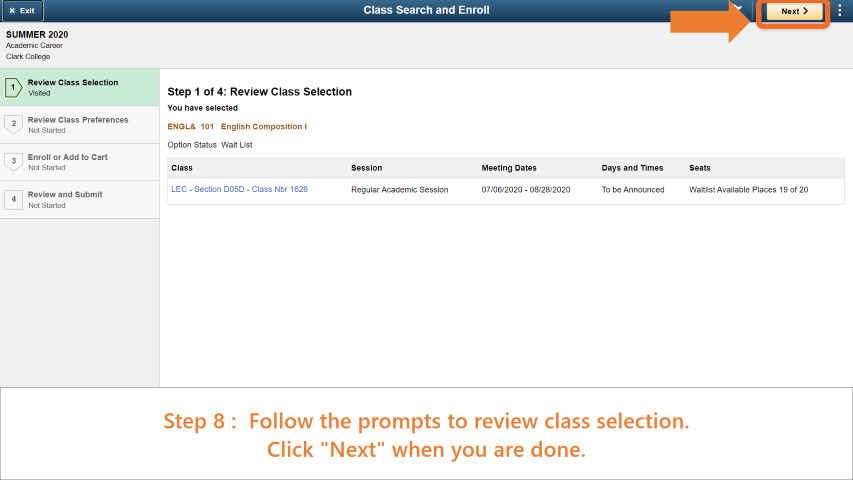
Step 8:
Follow the prompts to review class selection.
Click "Next" when you are done.
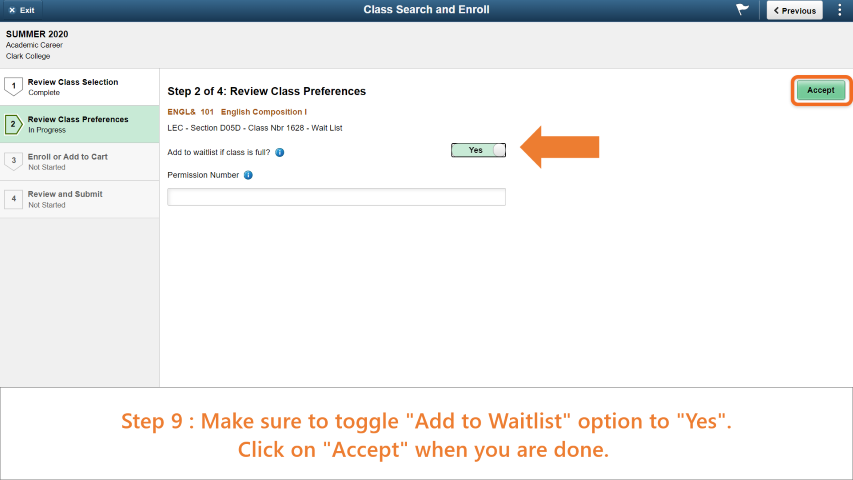
Step 9:
Make sure to toggle the "Add to Waitlist" option to "Yes".
Click on "Accept" when you are done.
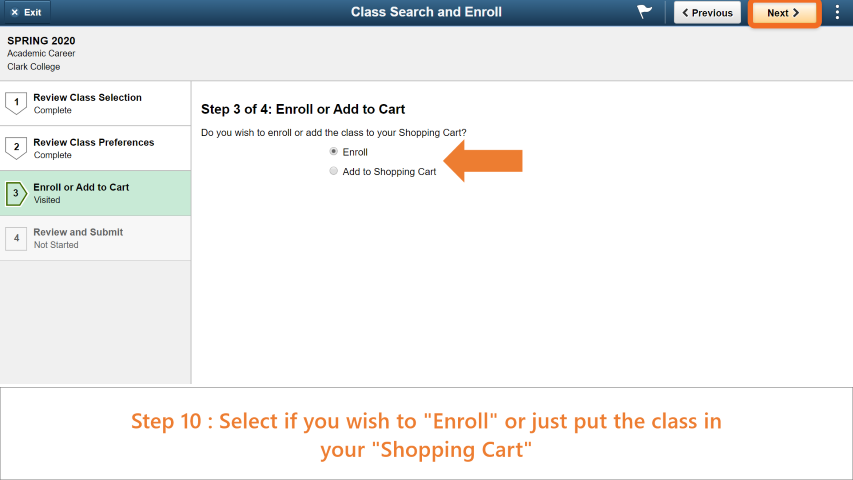
Step 10:
Select if you wish to Enroll" or just put the class in your "Shopping Cart".
Step 11:
Click on "Submit" to finalize the process.
Enroll in a Class with a Permission Number
Log in to MyClark@ctcLink and follow the guide below to enroll in a class with a permission number:
Step 1:
Enter your ctcLink ID into the ctcLink ID field then select the 'Next' button.
In the resulting pop-up, enter your password into the 'Password' field, then select
the 'Verify' button..
Step 2:
Click on 'Student Homepage'.
Step 3:
Click on "Manage Classes".
Step 4:
Click on "Class Search and Enroll" and choose the term you wish to enroll for.
Step 5:
Look up your Classes using the class name or keywords.
Step 6:
Select the course you wish to enroll in.
Step 7:
Select the class you wish to enroll in.
Step 8:
Follow the prompts to review class selection.
Click "Next" when you are done.
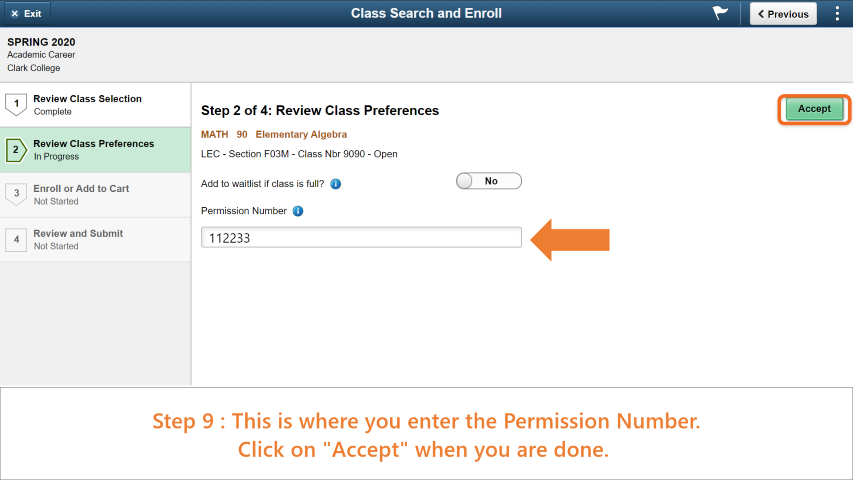
Step 9:
This is where you enter the Permission Number.
Click "Accept" when you are done.
Step 10:
Select if you wish to Enroll" or just put the class in your "Shopping Cart".
Step 11:
Click on "Submit" to finalize the process.
Step 12:
You have now enrolled for the class.
Repeat the process to add more Classes to your schedule.
View Your Class Schedule
Log in to MyClark@ctcLink and follow the guide below to view your class schedule:
Step 1:
Enter your ctcLink ID into the ctcLink ID field then select the 'Next' button.
In the resulting pop-up, enter your password into the 'Password' field, then select
the 'Verify' button..
Step 2:
Click on 'Student Homepage'.
Step 3:
Click on "Manage Classes".
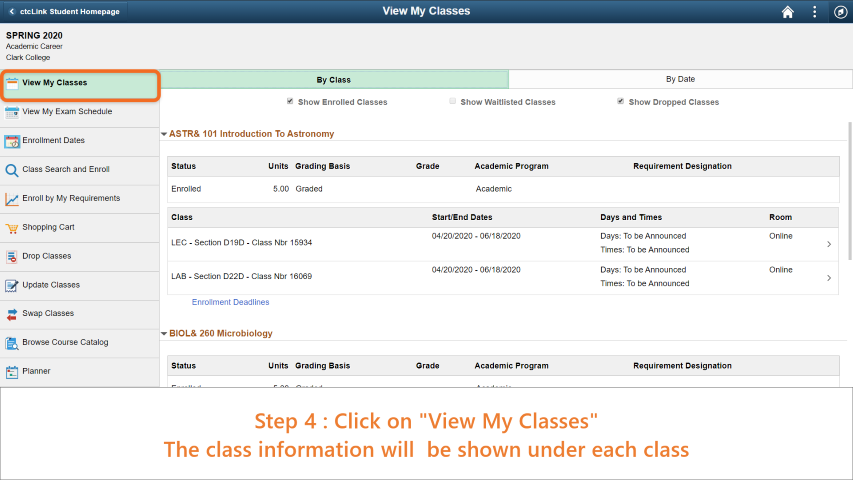
Step 4:
Click on "View My Classes".
The class information will be shown under each class.
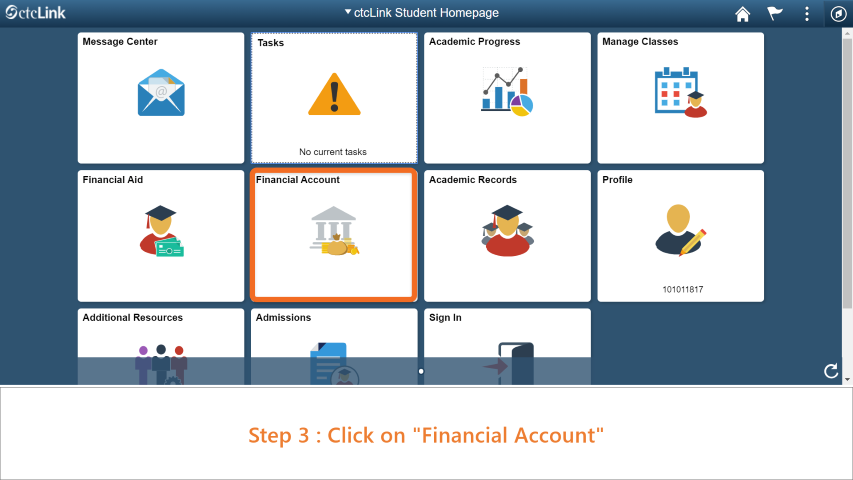
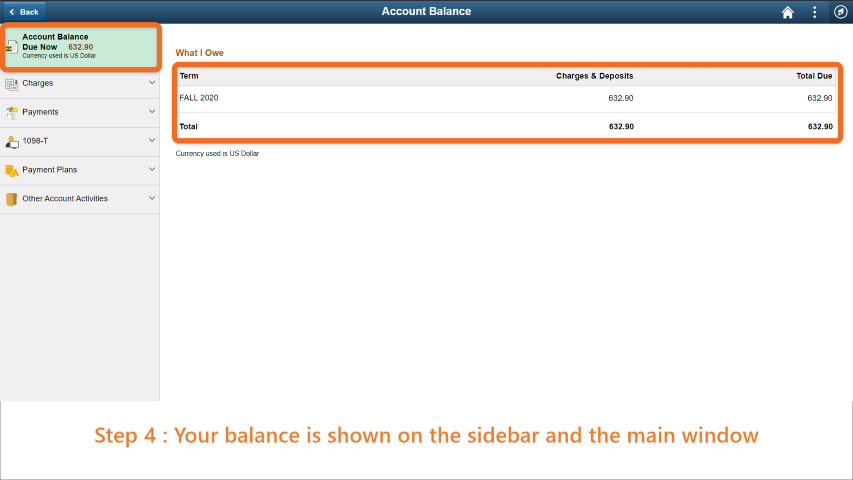
Check Your Account Balance
Log in to MyClark@ctcLink and follow the guide below to check your account balance:
Step 1:
Enter your ctcLink ID into the ctcLink ID field then select the 'Next' button.
In the resulting pop-up, enter your password into the 'Password' field, then select
the 'Verify' button..
Step 2:
Click on 'Student Homepage'.
Step 3:
Click on "Financial Account".
Step 4:
Your balance is shown on the sidebar and in the main window.
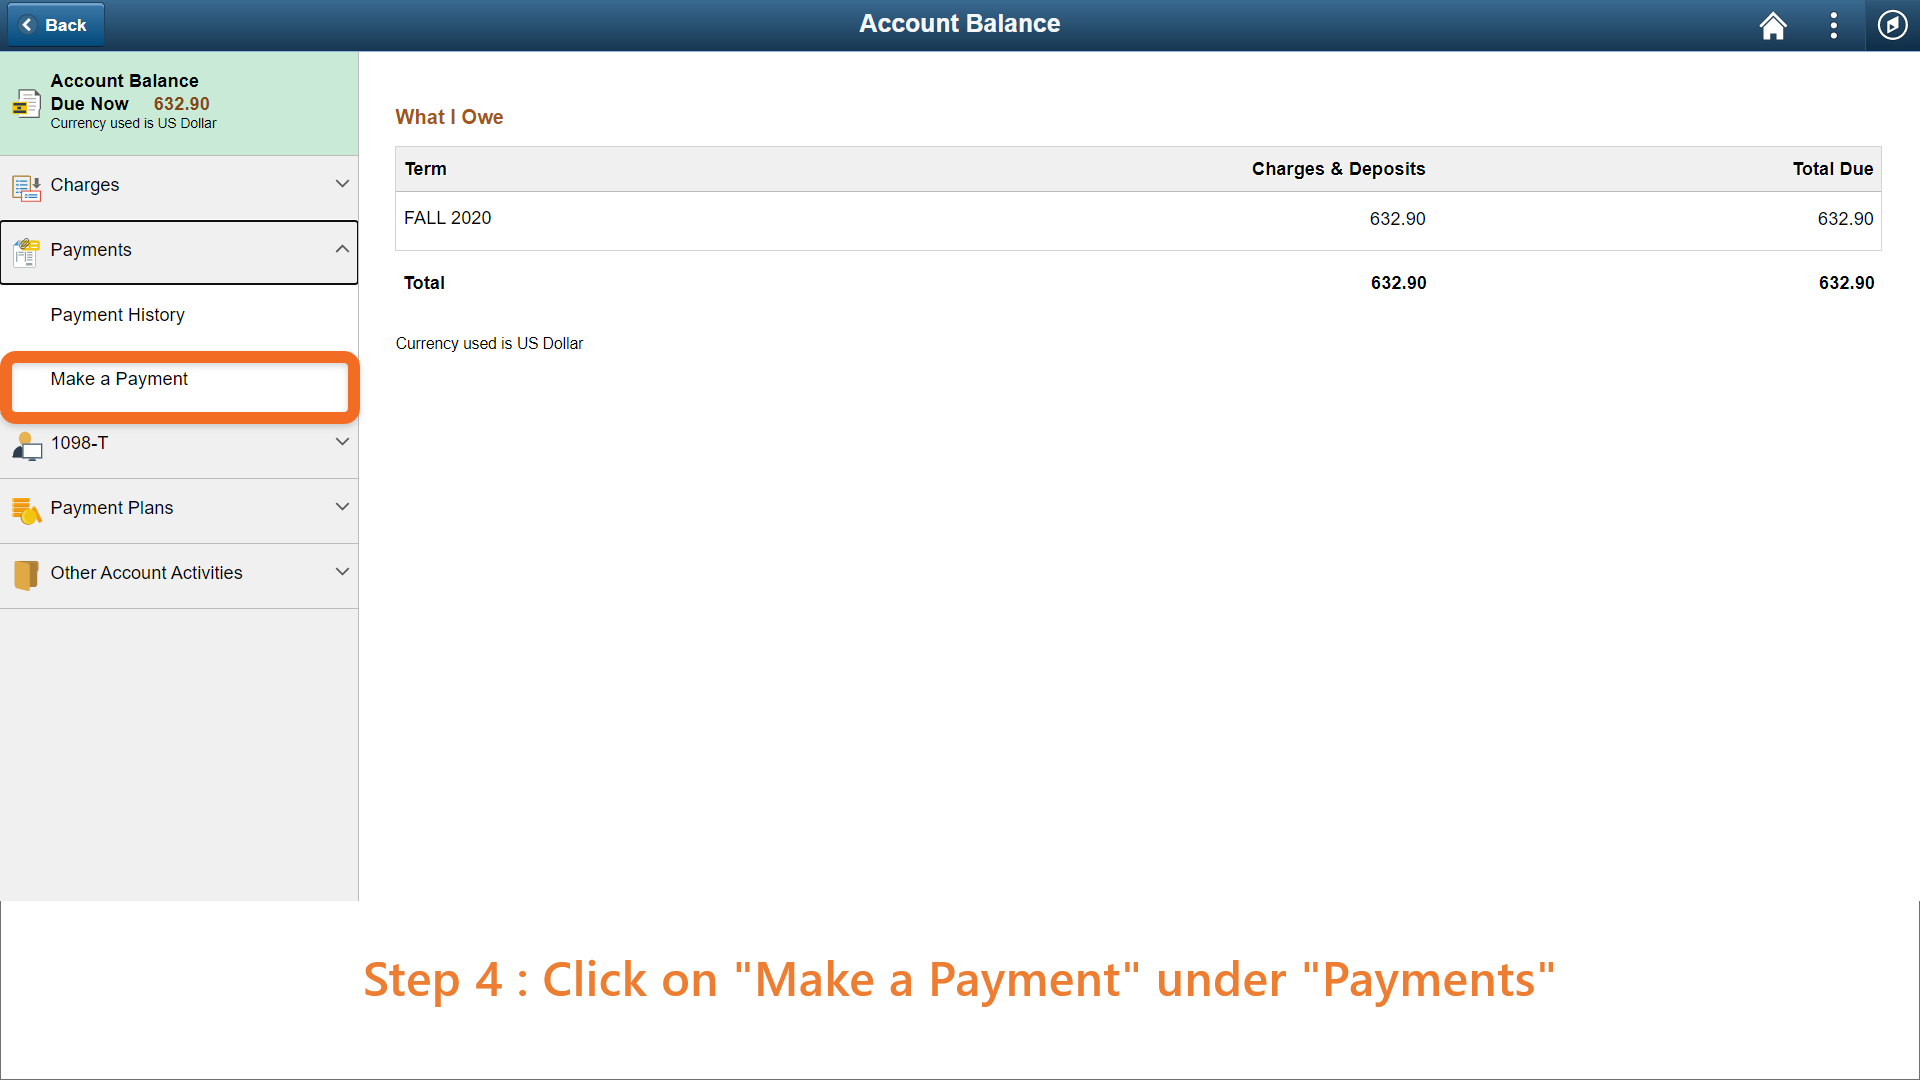
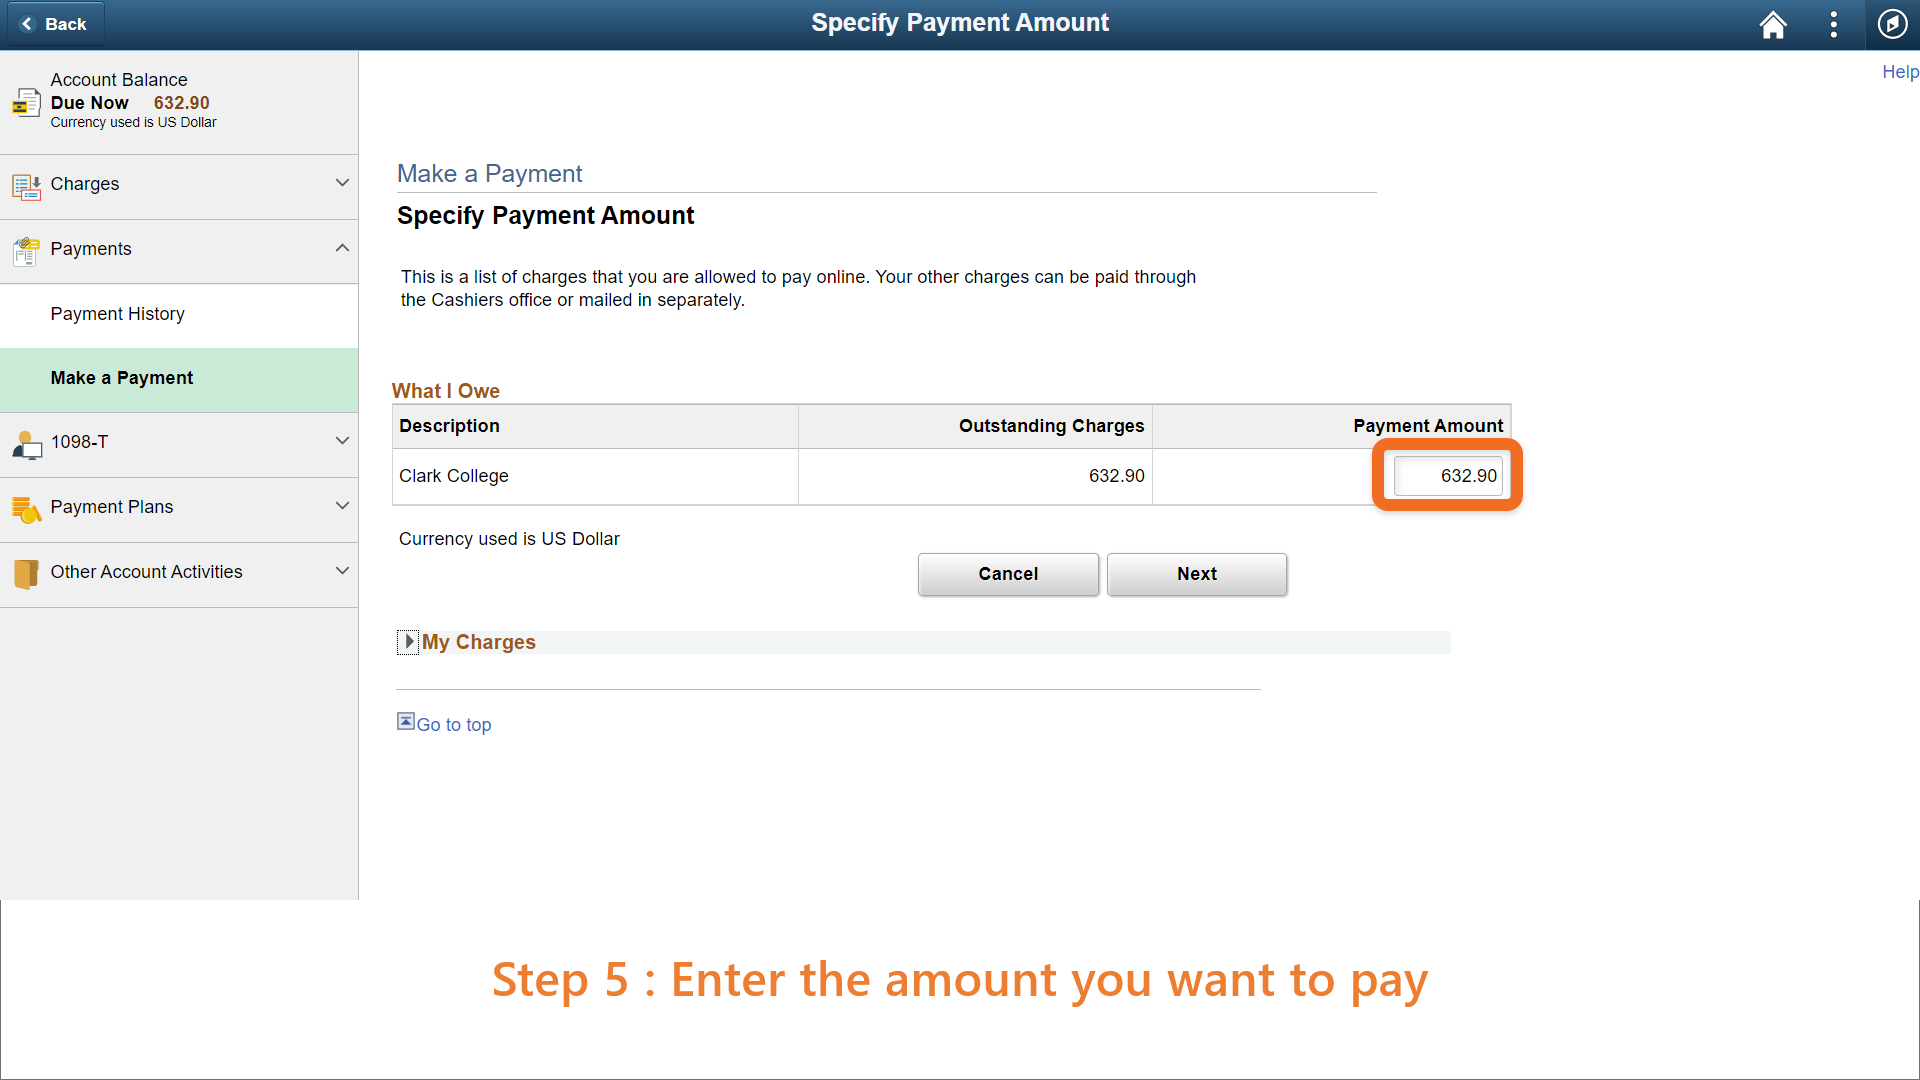
Make a Payment on Your Account
Log in to MyClark@ctcLink and follow the guide below to make a payment:
Step 1:
Enter your ctcLink ID into the ctcLink ID field then select the 'Next' button.
In the resulting pop-up, enter your password into the 'Password' field, then select
the 'Verify' button..
Step 2:
Click on 'Student Homepage'.
Step 3:
Click on "Financial Account".
Step 4:
Click on "Make a Payment" under "Payments".
Step 5:
Enter the amount you want to pay.
Step 6:
Confirm the amount and then click "Continue to Make Payment".
Step 7:
Fill in your information and click "Finish".
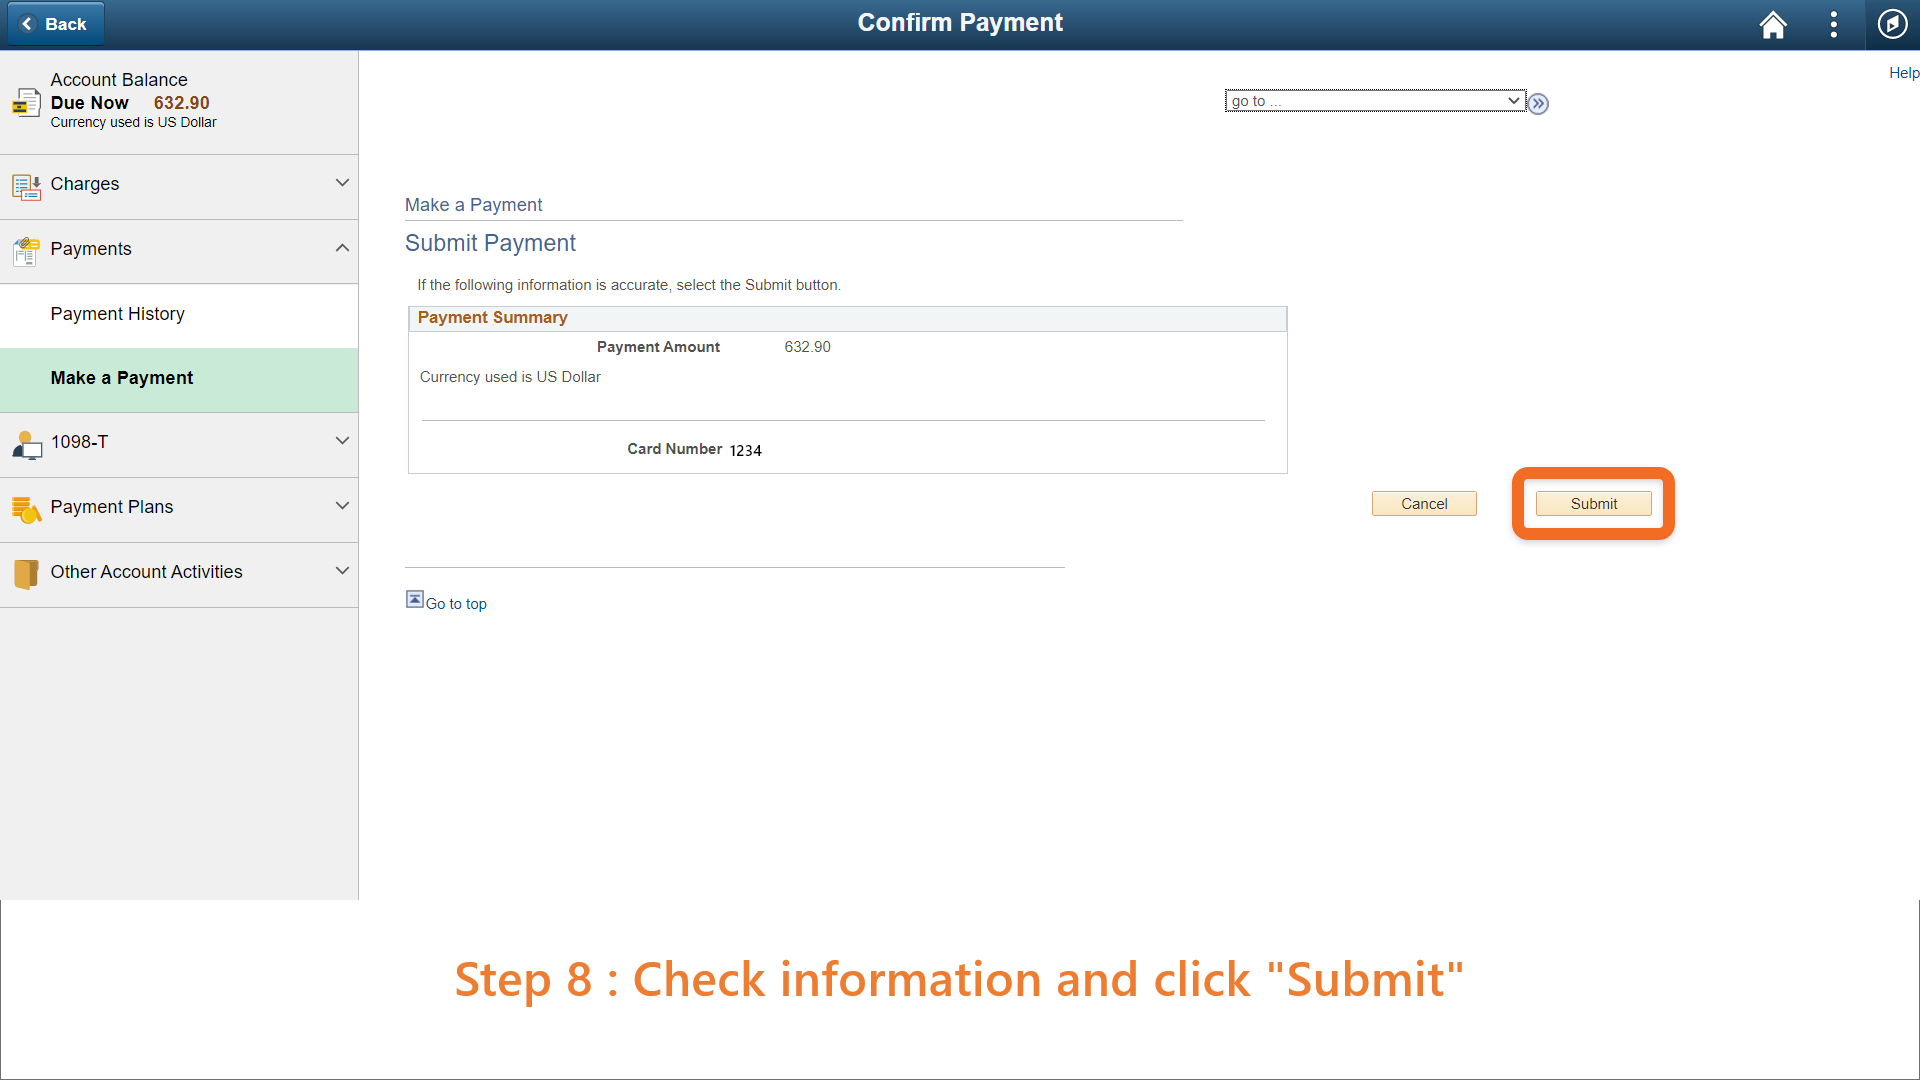
Step 8:
Check information and click "Submit".
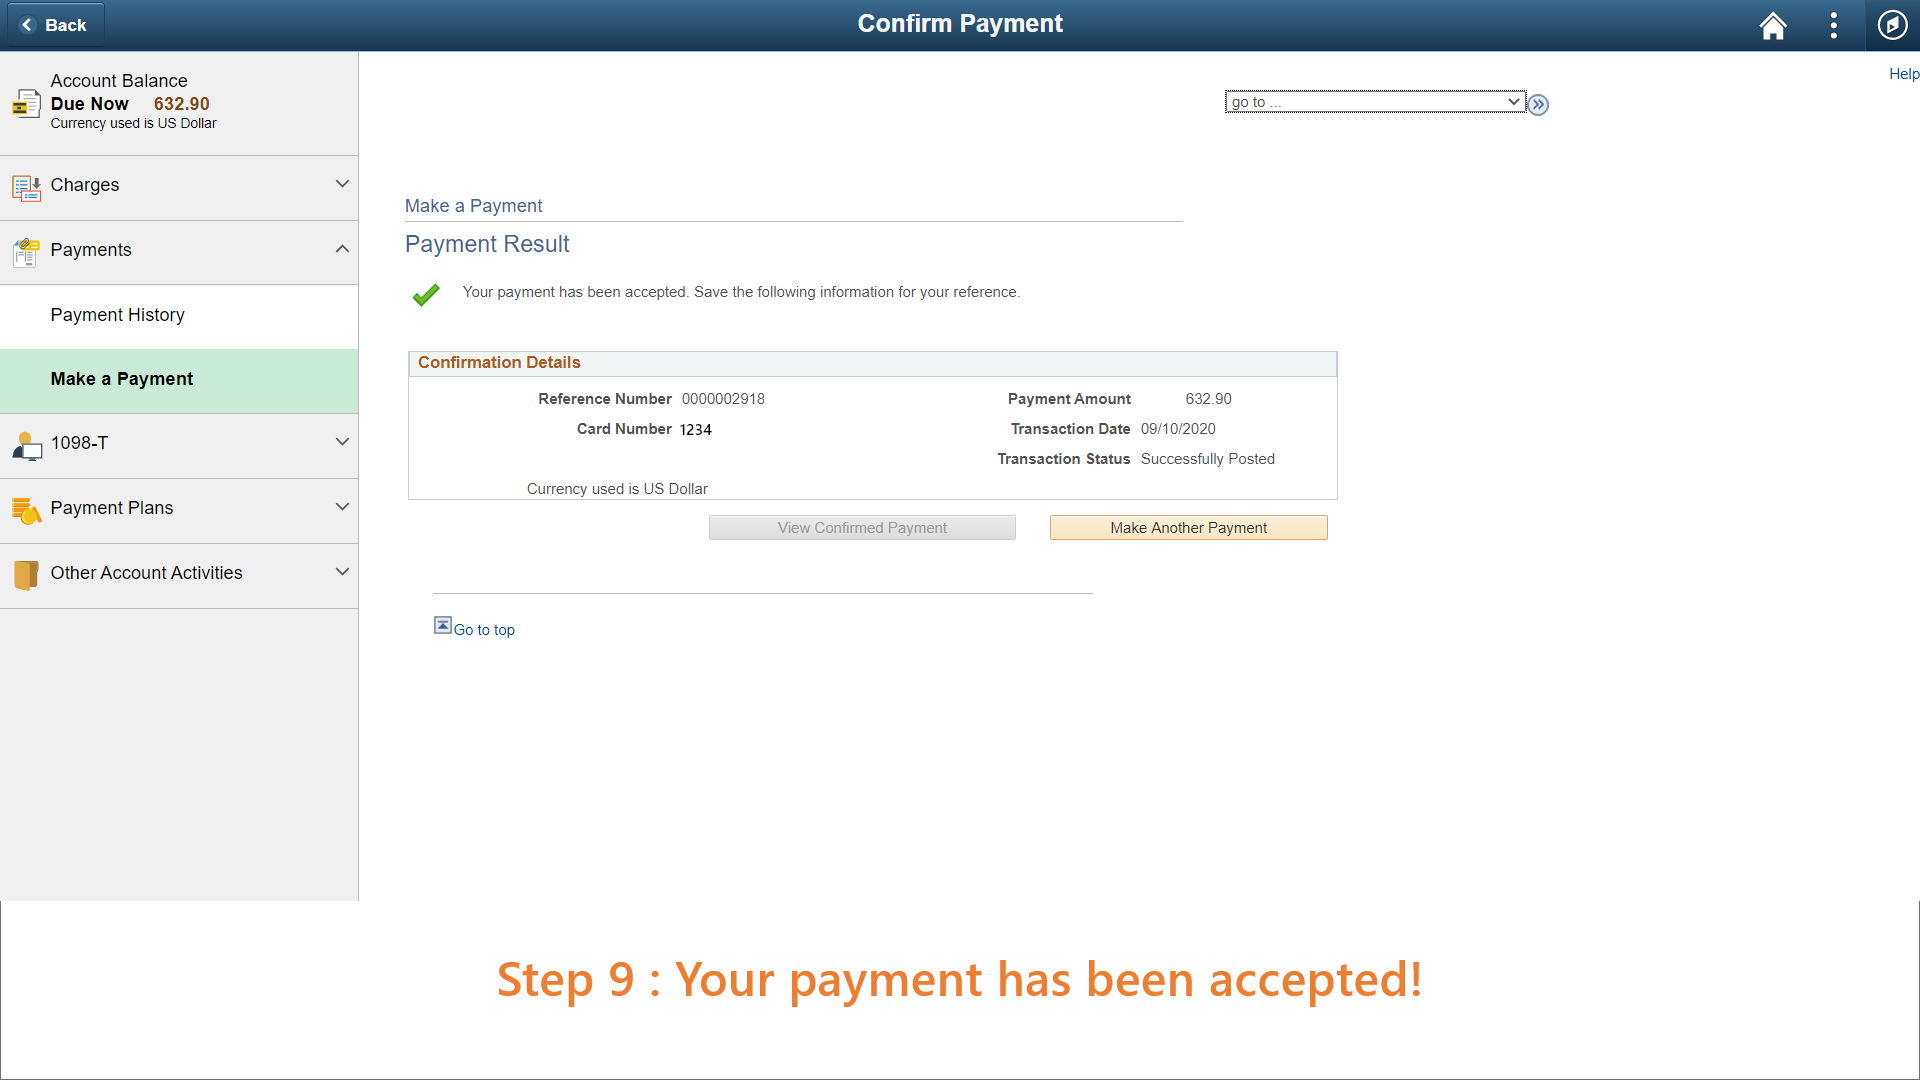
Step 9:
Your payment has been accepted!
Enroll in a Payment Plan (STEPP)
Log in to MyClark@ctcLink and follow the guide below to enroll in the STEPP payment plan:
Step 1:
Enter your ctcLink ID into the ctcLink ID field then select the 'Next' button.
In the resulting pop-up, enter your password into the 'Password' field, then select
the 'Verify' button..
Step 2:
Click on 'Student Homepage'.
Step 3:
Click on "Financial Account".
Step 4:
Click on "Enroll in Payment Plan" under "Payment Plans".
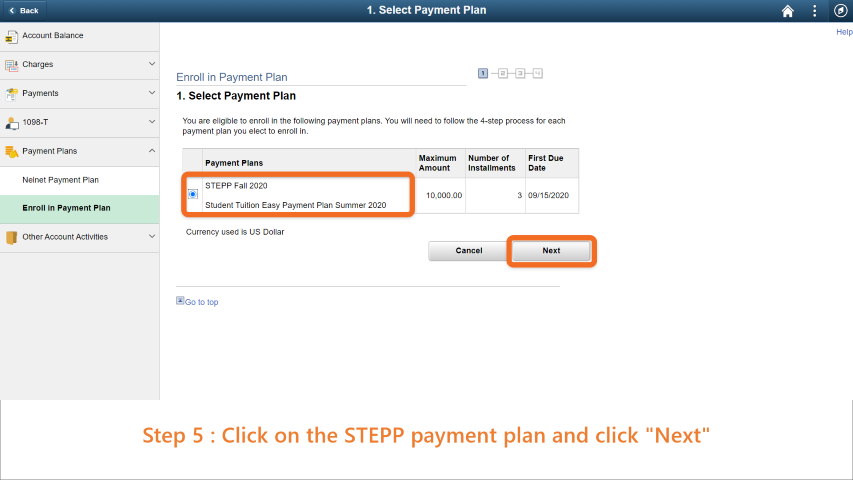
Step 5:
Click on the STEPP Payment Plan and click "Next".
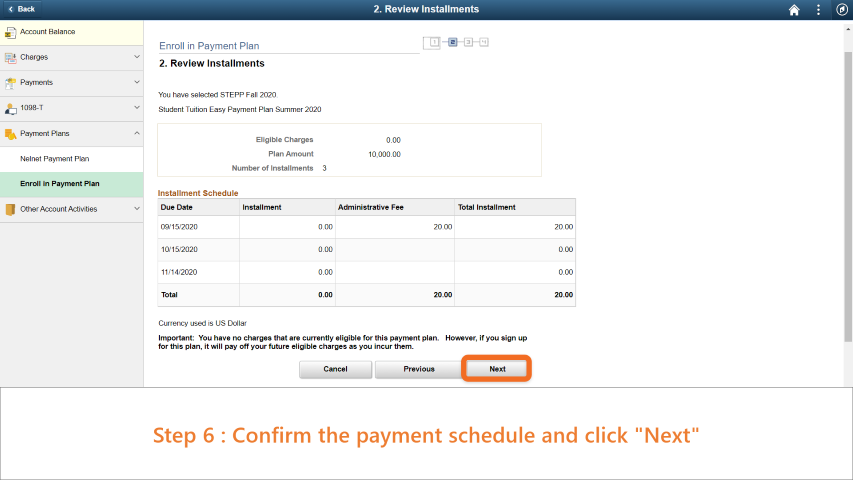
Step 6:
Confirm the payment schedule and click "Next".
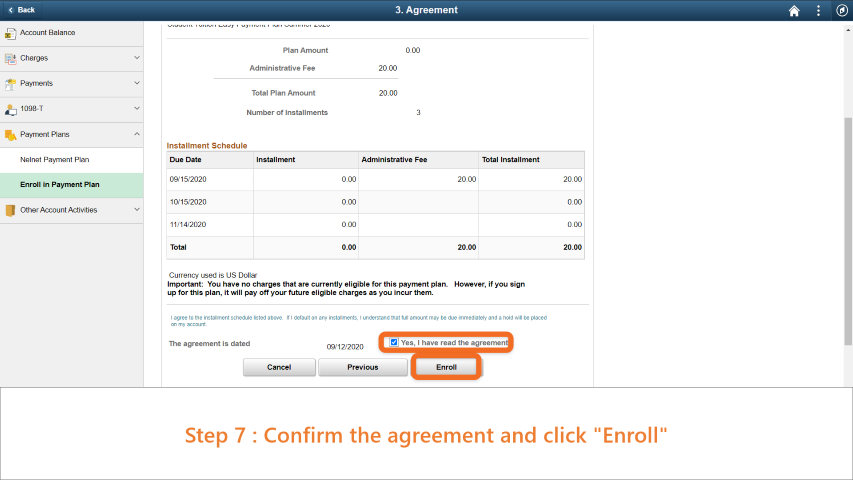
Step 7:
Confirm the agreement and click "Enroll".
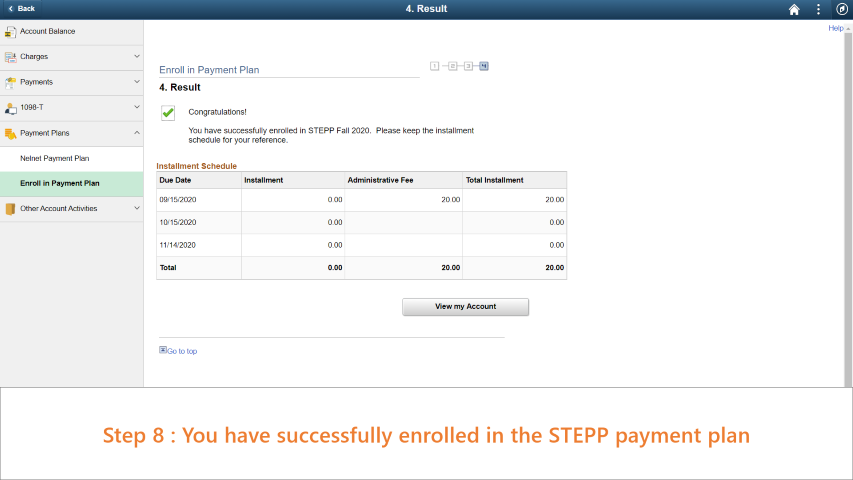
Step 8:
You have successfully enrolled in the STEPP payment plan.
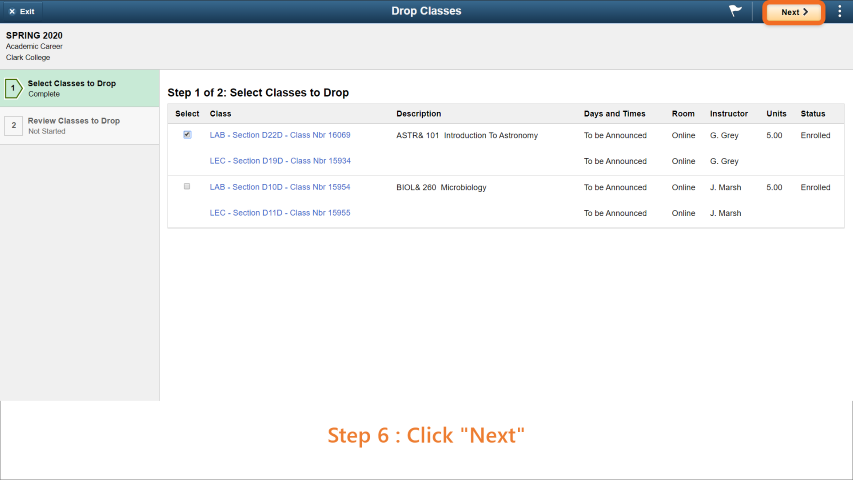
Drop/Withdraw from Classes
Log in to MyClark@ctcLink and follow the guide below to drop from your Classes:
Step 1:
Enter your ctcLink ID into the ctcLink ID field then select the 'Next' button.
In the resulting pop-up, enter your password into the 'Password' field, then select
the 'Verify' button..
Step 2:
Click on 'Student Homepage'.
Step 3:
Click on "Manage Classes".
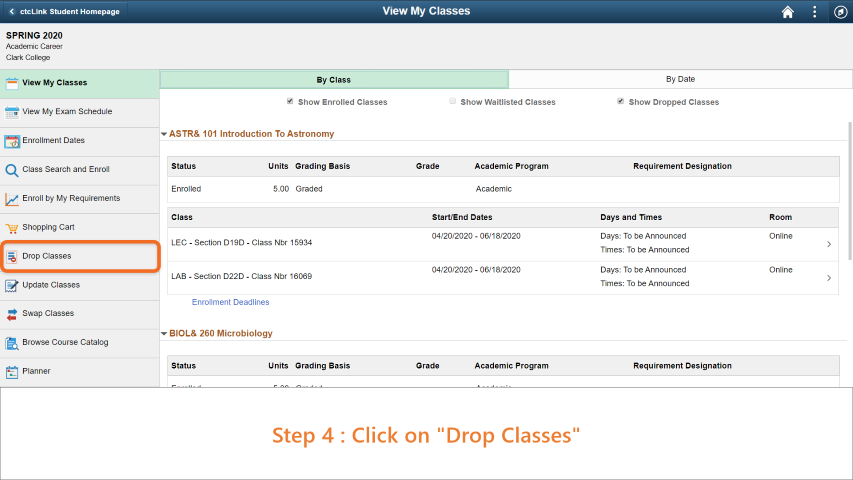
Step 4:
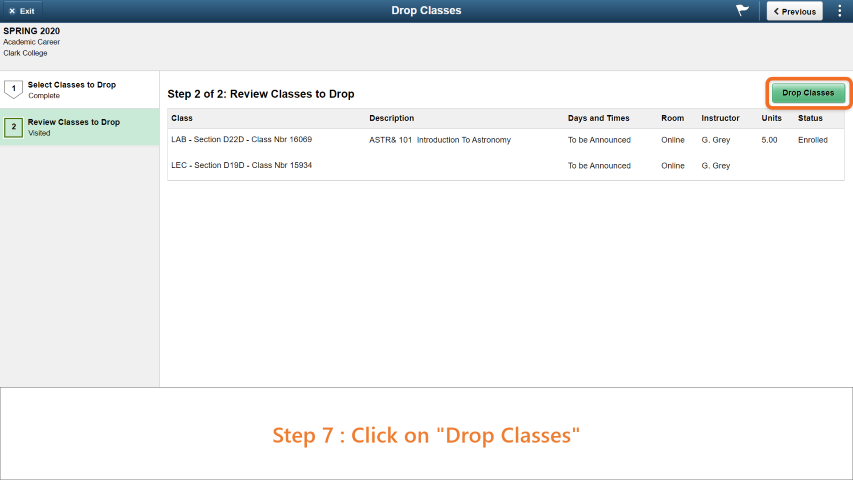
Click on "Drop Classes".
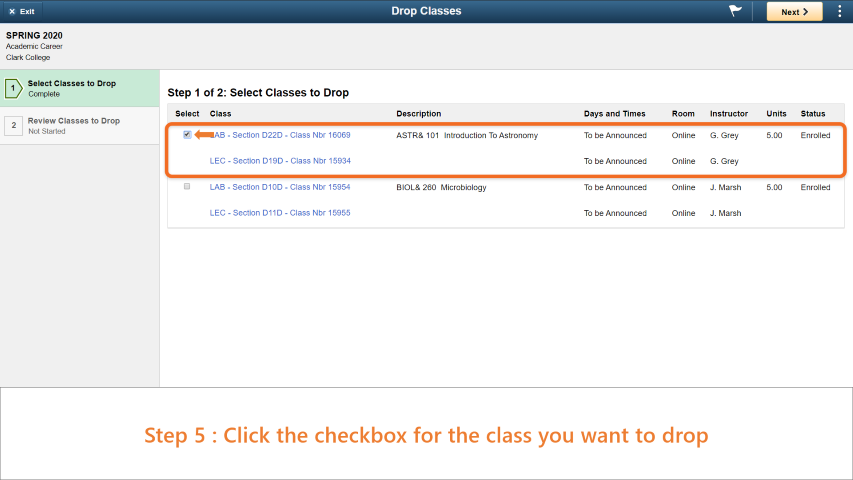
Step 5:
Click the checkbox for the class you want to drop.
Step 7:
Click on "Drop Classes".
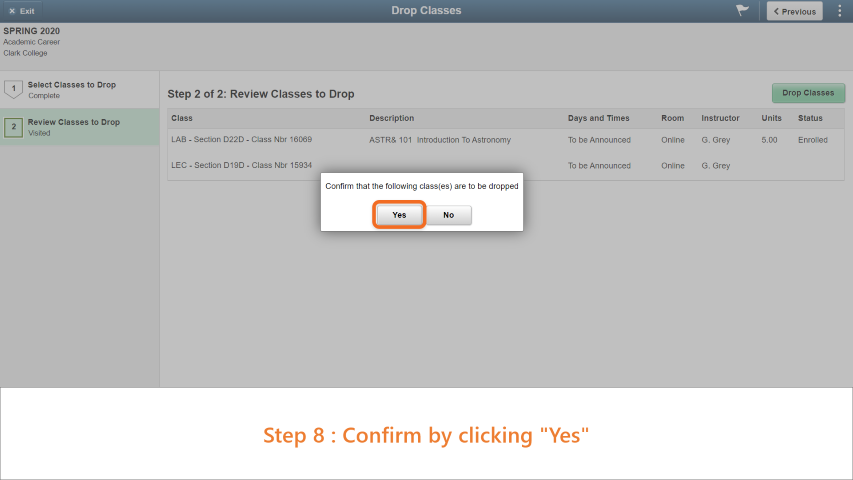
Step 8:
Confirm by clicking "Yes".
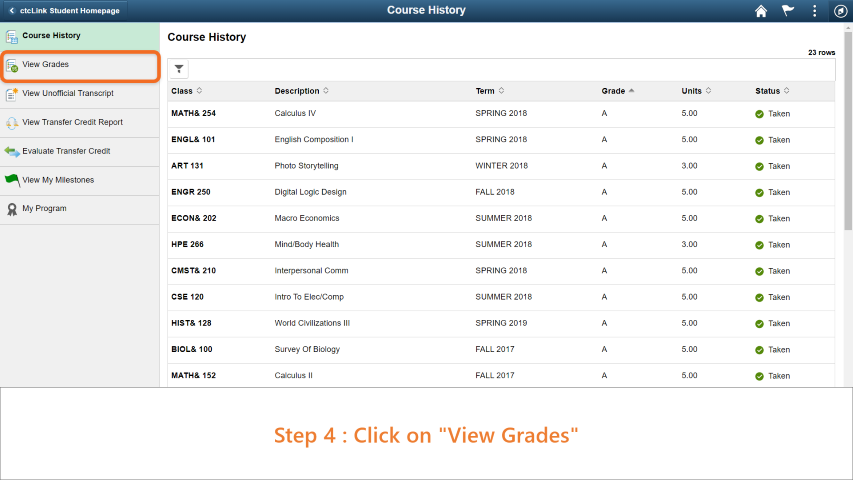
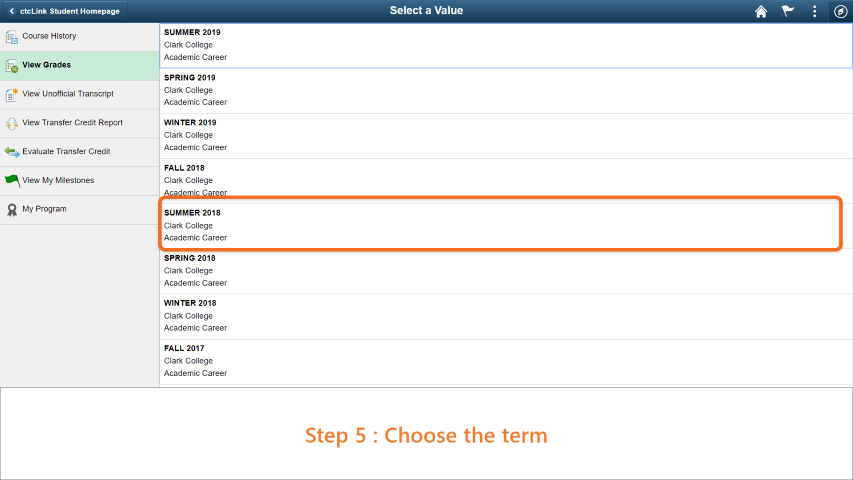
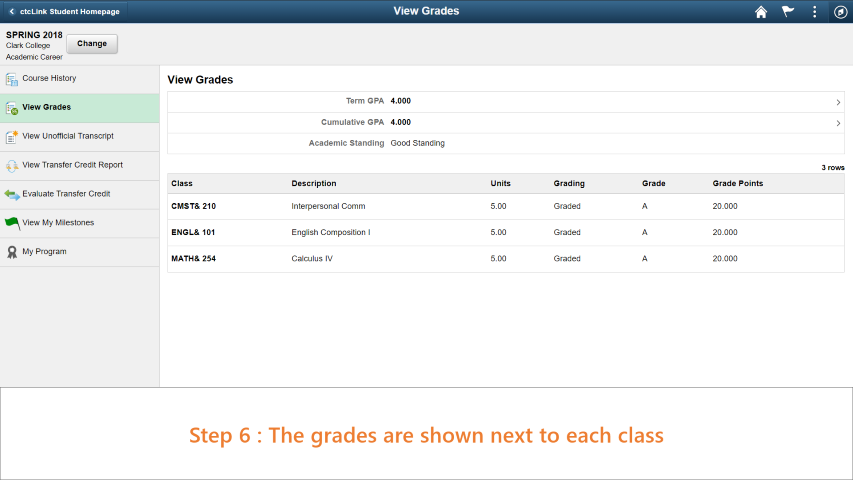
View Your Grades
Log in to MyClark@ctcLink and follow the guide below to view your grades:
Step 1:
Enter your ctcLink ID into the ctcLink ID field then select the 'Next' button.
In the resulting pop-up, enter your password into the 'Password' field, then select
the 'Verify' button..
Step 2:
Click on 'Student Homepage'.
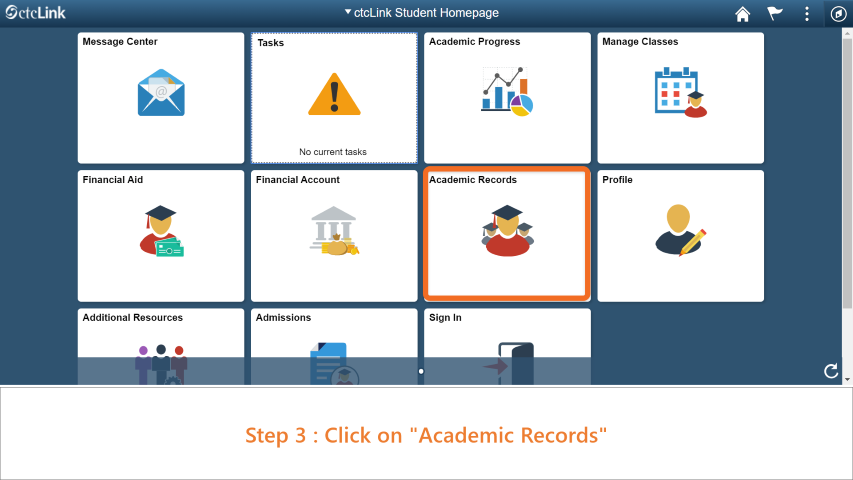
Step 3:
Click on "Academic Records".
Step 4:
Click on "View Grades".
Step 6:
The grades are shown next to each class.
View/Print Your Unofficial Transcript
Log in to MyClark@ctcLink and follow the guide below to view your grades:
Step 1:
Enter your ctcLink ID into the ctcLink ID field then select the 'Next' button.
In the resulting pop-up, enter your password into the 'Password' field, then select
the 'Verify' button..
Step 2:
Click on 'Student Homepage'.
Step 3:
Click on "Academic Records".
Step 4:
Click on "View Unofficial Transcript".
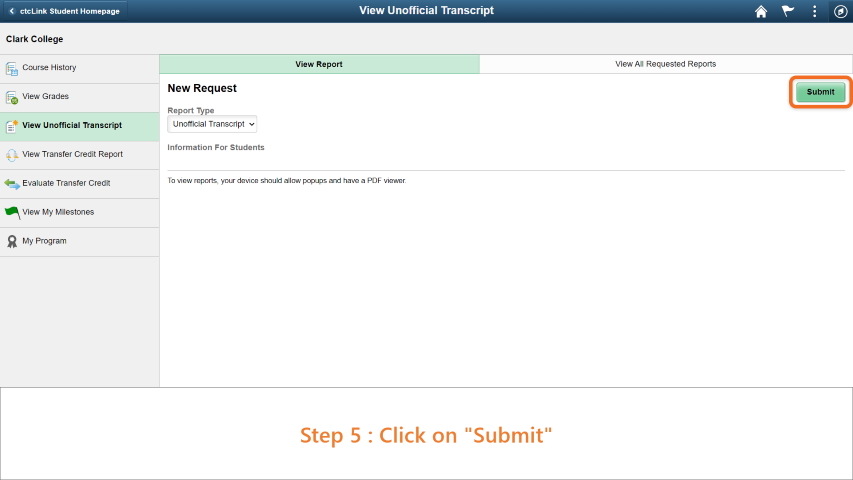
Step 5:
Click on "Submit".
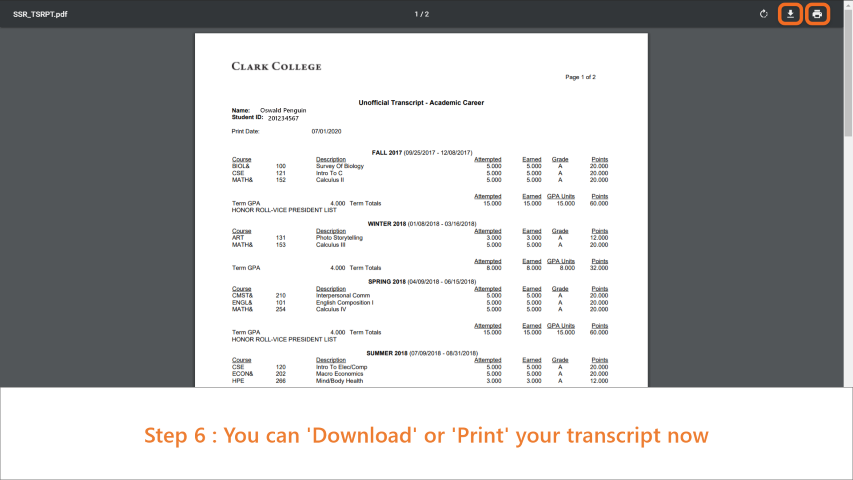
Step 6:
You can 'Download' or 'Print' your transcript now.
Apply for Graduation
Log in to MyClark@ctcLink and follow the guide below to apply for graduation:
Step 1:
Enter your ctcLink ID into the ctcLink ID field then select the 'Next' button.
In the resulting pop-up, enter your password into the 'Password' field, then select
the 'Verify' button..
Step 2:
Click on 'Student Homepage'.
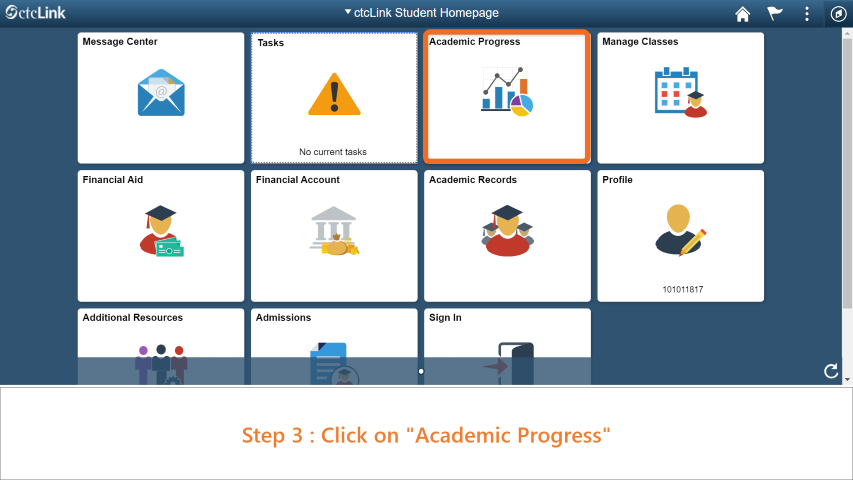
Step 3:
Click on "Academic Progress".
Step 4:
Click on "Apply for Graduation".
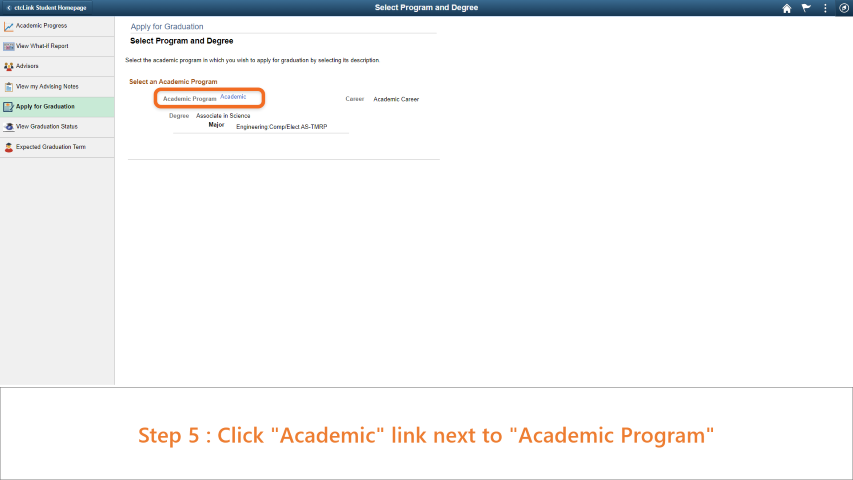
Step 5:
Click the "Academic" link next to "Academic Program".
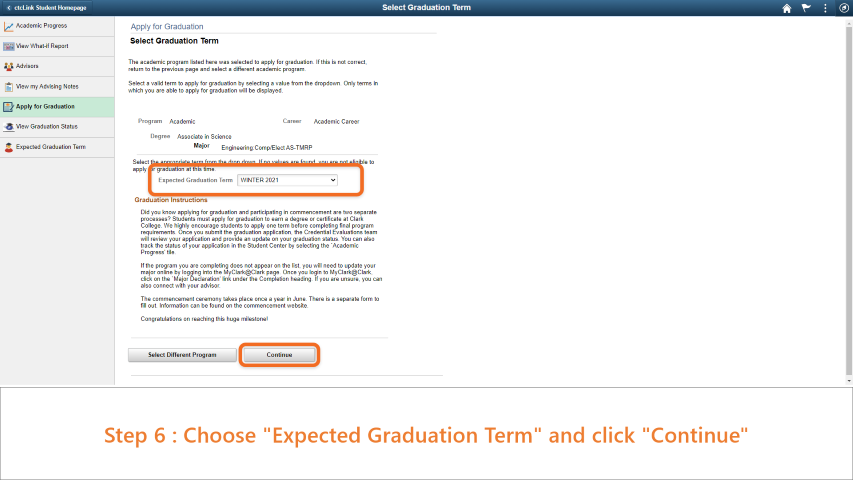
Step 6:
Choose "Expected Graduation Term" and click "Continue".
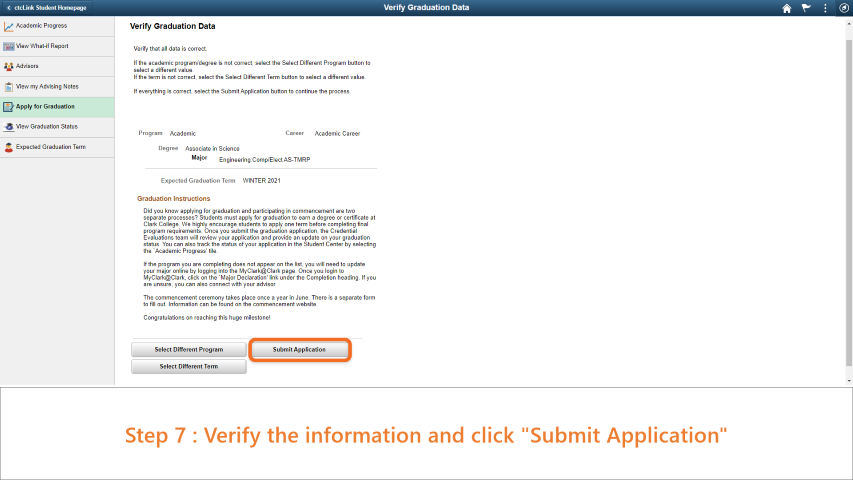
Step 7:
Verify the information and click "Submit Application".
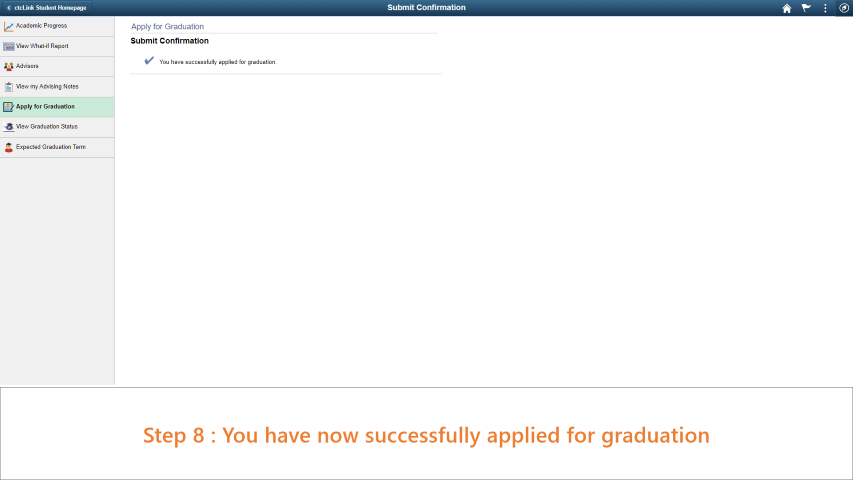
Step 8:
You have now successfully applied for graduation.
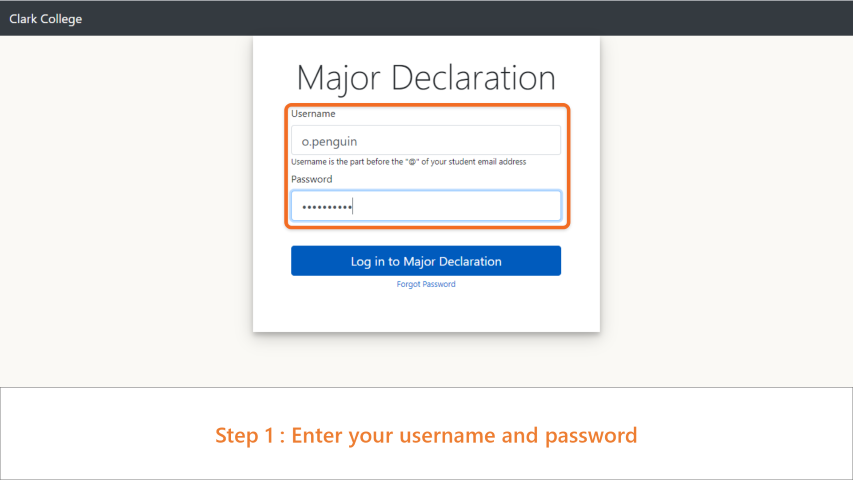
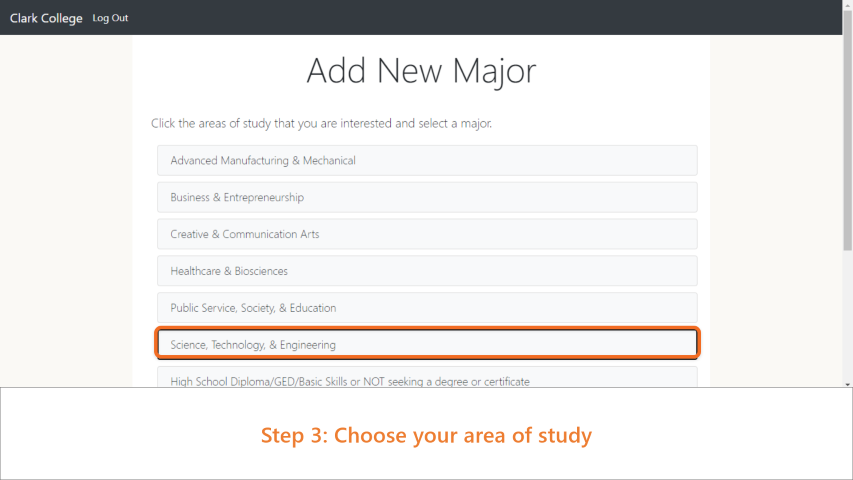
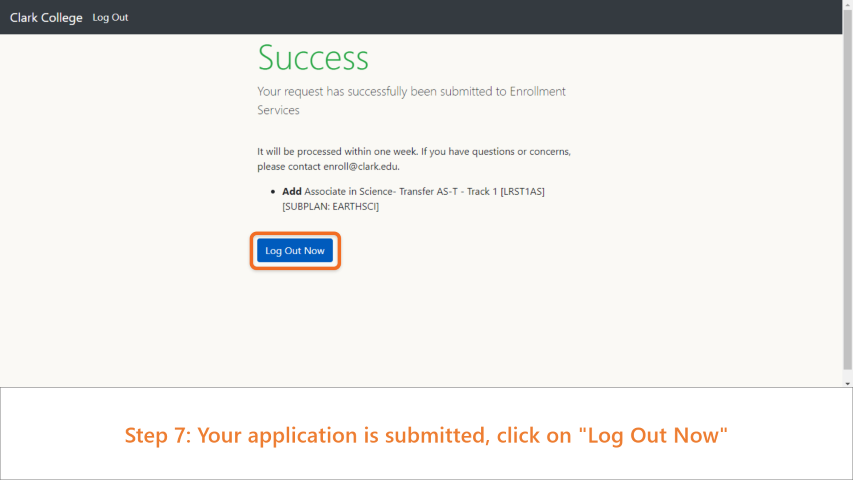
Change or Update your major
Go to Major Declaration Form and follow the guide below to change your major:
Step 1:
Enter your username and password.
Step 2:
Click on "I want to add a new major".
Step 3:
Choose your area of study.
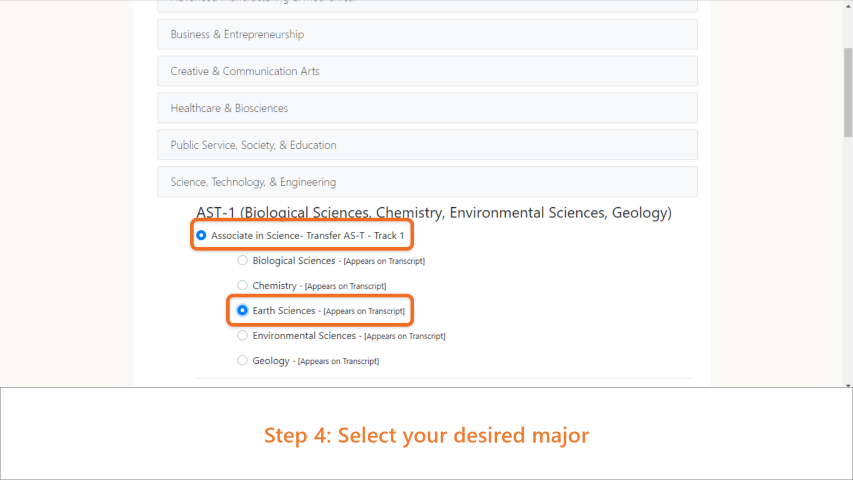
Step 4:
Select your desired major.
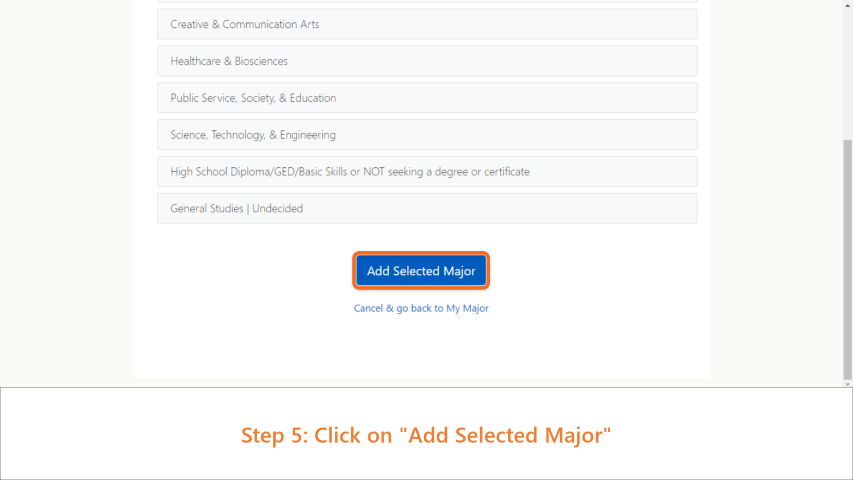
Step 5:
Click on "Add Selected Major".
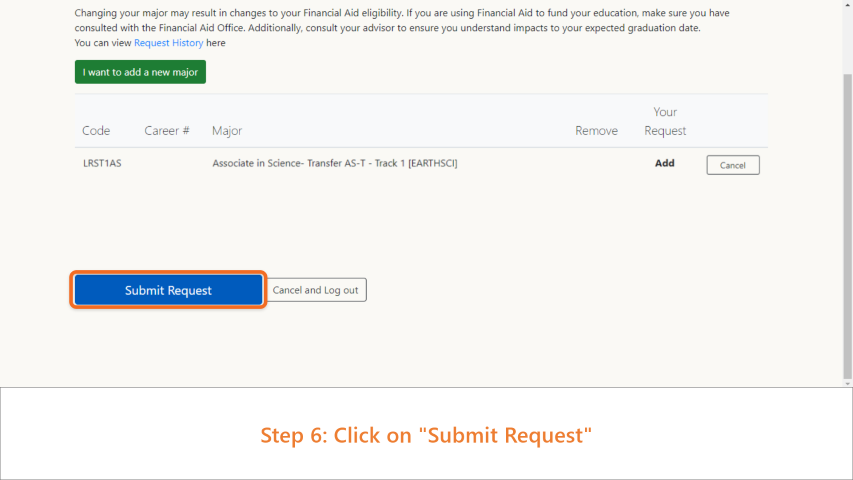
Step 6:
Click on "Submit Request".
Step 7:
Your application is submitted. Click on "Log Out Now".
If you are having issues with your account and these tutorials did not resolve the
issue, please contact the TechHub for assistance.